 Author
 |
Topic: Blasted Clock Bulb! (OR CHANGE THE BULB) (Read 7194 times) |
|
PJDavis
Senior Member


2 x 1995 Jag X300 3.2 / 4.0 (Henley) 1957 XK140
 
Posts: 1474
|
 |
Blasted Clock Bulb! (OR CHANGE THE BULB)
« on: Nov 4th, 2012, 4:48pm » |
|
Right. Finally got the clock bulb sorted without taking the dash right out! So for those that have struggled before, I'll give a wee run-down on how I managed.
Take out the two torx screws at the side of the dash that you can see with the drivers door open, these hold the wee money-box in place, and then of course take out the two cross-point screws that you can see when the money-box is open, where the money-box door closes to. This allows you now to see the two cross-point screws that hold that part of the 'plastic-wood-effect' dash in place, so take those out.
There's two cross-point screws at the top of the main dash-dials, take those out. There's a further two cross-point screws in the same position as the main-dial screws in the stereo slot, take those two out. Remove the heating/climate control panel, (as shown in another bit of the forum) I use a couple of 30 thou feeler blades. Un-couple the wiring strip on the control panel and set-aside.
I use a few thicker but not too thick feeler-gauges, and I run them slowly around the edge of the 'plastic-wooden' dash to ascertain where the wee clips are, and when you find the clips, you push another feeler-blade into the position (the same as you have done with the climate control panel) whilst gently prising the dash away from the top black bit. The tricky one is on the right of the 'wooden-plastic' dash on the vertical bit.
Drop the steering wheel down and pull it out as far as it goes. Gently prise the dash out from all points, and you'll notice behind the main light switches, there's a wee set of wires that are stretched to max, just pop the plug apart, it was a blue plug on my car. This allows the dash to move a wee bit further out.
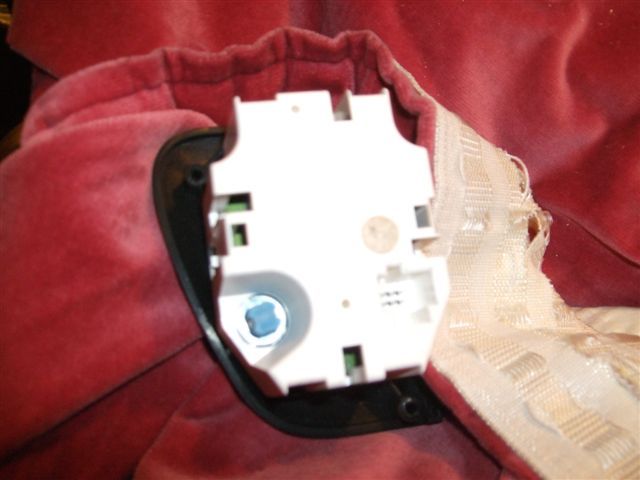
OK, you can now change the clock bulb! If you were looking at the back of the clock, the bulb is mounted at about 7 o'clock on the left, it has to be twisted anti-clock by 90 degrees. If you've got small fingers, you can just get yer nails in and twist it out, I haven't so I use a very small pair of thin-nose pliers that I grip the plastic bulb mounting and twist it out, presto it's out, but that's the easy bit! The difficulty has always been getting the fresh bulb-unit back in.
I spent a long time looking at this with mirrors and all sorts about six months ago, and couldn't get the bulb unit back in.
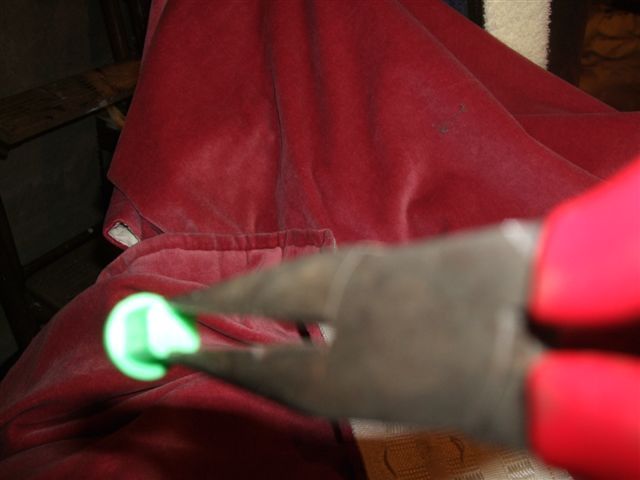
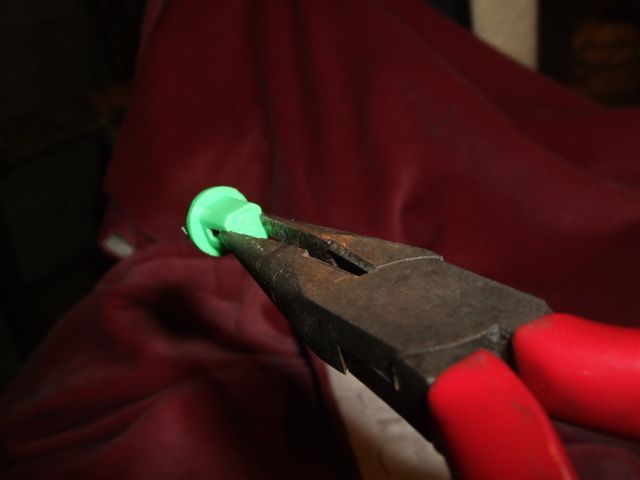
A small pair of thin-nosed pliers, hold the bulb-unit with the tips of the pliers in the two small cut-outs on the back of the bulb-unit where the wee foil bulb connections are, and then the most important bit, tie-wrap the pliers-handles together tightly so that you can grip the pliers anywhere. Then just by feel or using a mirror, the pliers need to be exactly up and down or vertical, carefully push into the slot and turn the pliers clock-wise 90 degrees / until the handles are side to side horizontal. Make sure the bulb unit is fully 'home' before you twist it 90 degrees. I did this by feel, but using a mirror is maybe best. I used my right hand through the wooden-plastic dash main clocks window!
I know this is long-winded, but it's easy now to do it, I'm only sorry I didn't think to take pictures, I'll try to remember next time, probably less than a year away! My advantage was I had a removed clock to reference how to get the bulb in and out.
Remember to reset the climate control unit once it's back together, again somewhere else on the forum.
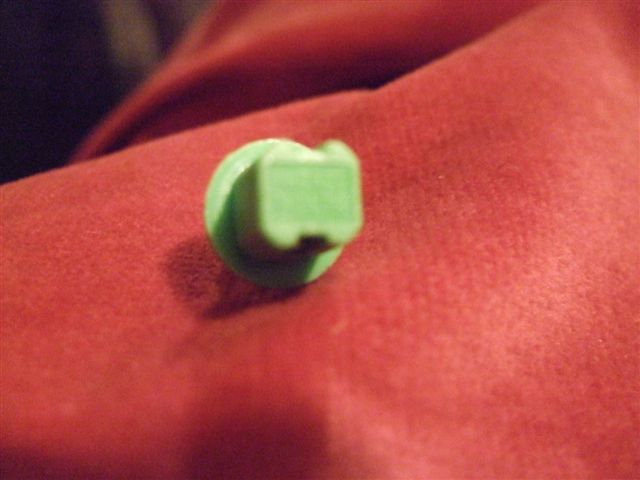
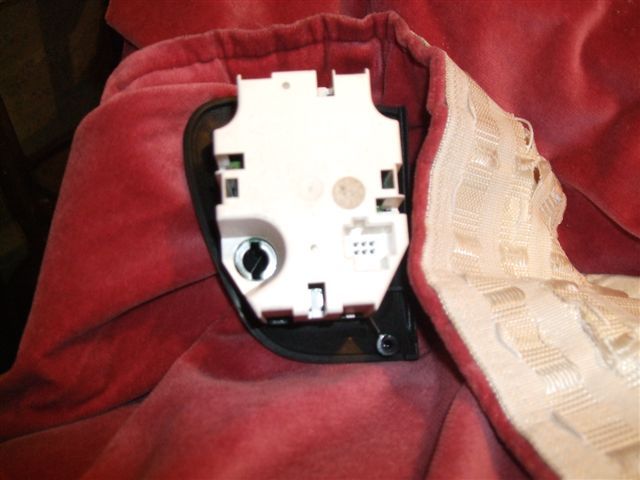
A couple of pics to help you through the process. The bulb-unit showing the cut-outs, the bulb unit held by pliers in the push-in position and then the twisted position to lock the unit in place. The pliers with a tie-wrap to hold the bulb-unit to stop it slipping out of the jaws. And a couple of pics of the back of the clock showing the bulb-unit in place, and the empty socket awaiting a bulb.
One thing to note, after getting the bulb-unit in position with the pliers, DON'T leave the weight of the pliers dangling on the bulb-unit, just hold the pliers steady and then cut the tie-wrap with snips.

hth
Peter
|
|
 IP Logged IP Logged |
I love 'Movvy'
1995 Jaguar XJ6 X300 3.2 (Henley)
1995 Jaguar XJ6 X330 4.0 (Dopey)
1957 Jaguar XK140 USA (converted to RHD, and to have fitted Mk10 420G Engine with BW 65 Auto Trans)
|
|
|
TiberiuS
Senior Member

Ex. 1996 2.3 Ultima - RIP P789 KHJ

Posts: 2257
|
 |
Re: Blasted Clock Bulb!
« Reply #1 on: Nov 4th, 2012, 6:55pm » |
|
Yeah, that brings back memories 
Replaced all mine with LEDs in the end, I remember that was a lot of fun when I got to the door switches and had to work out how to get them apart to fit the LEDs in 
Bruce.
|
|
IP Logged |
Bruce - '07 Jaguar XKR coupe, '95 Jaguar XJ Sport 4.0, '82 Ford Capri 2.0 Ghia, '15 Honda Civic (sloooooww..)
|
|
|
Snoopy
Administrator


Very old.BAD tempered and missing friends.
Posts: 6278
|
|
Re: Blasted Clock Bulb! (OR CHANGE THE BULB)
« Reply #2 on: Nov 5th, 2012, 6:55am » |
|
Thanks for the write up I am sure it will be MOST useful.
|
|
IP Logged |
HELP the FORUM.Please DONATE
|
|
|
PJDavis
Senior Member
2 x 1995 Jag X300 3.2 / 4.0 (Henley) 1957 XK140
Posts: 1474
|
|
Re: Blasted Clock Bulb! (OR CHANGE THE BULB)
« Reply #3 on: Nov 5th, 2012, 7:08am » |
|
I'm going to take a couple of pictures tonight of the back of a clock, and the bulb unit with the wee pliers tie-wrapped in the correct position.
Peter
|
|
IP Logged |
I love 'Movvy'
1995 Jaguar XJ6 X300 3.2 (Henley)
1995 Jaguar XJ6 X330 4.0 (Dopey)
1957 Jaguar XK140 USA (converted to RHD, and to have fitted Mk10 420G Engine with BW 65 Auto Trans)
|
|
|
|


 Home
Home Help
Help Search
 Members
 Login
Login


 Send Topic
 Print
Print