The 24V Cosworth engined Scorpio is a powerful beast but also
has a thirst to match. Having owned mine for 2 years and covered around 25,000
miles in that time, I have experienced around 19mpg around town and 25mpg on a
fast motorway run. I have to boast that mine has been extremely well looked
after with new oil and filters every 5000 miles, new plugs every 10,000 along
with a regular MAF and Idle control clean. So it runs well and at 114,000 miles
seems ready to go for another 50,000 before needing any work.But with petrol
prices increasing and having made the decision to keep the car (well as the web
master I couldn't keep developing the site unless I still owned one!) I decided
to invest in an LPG conversion courtesy of
Gas Power UK Ltd.
I started doing my homework and looking at conversions done by other Scorpio
owners, which were based around an
FES Autogas system.
This placed an injector at the position of the MAF at the start of the inlet
manifold trunking which injected the LPG which was then mixed with air in the
inlet manifold and sucked into the cylinders where it is ignited.
Although this system does work, it presents a number of issues that caused me
some concern.
- It's quite a difficult system to tune across the engine rev/load range
- It fills the (plastic) inlet tract with a highly flammable mixture that can
ignite and destroy the inlet tracts
- There are delays is switching between LPG and Petrol and back again
- It is open loop and relies upon electro-mechanical control systems
- There are performance issues
Now, don't get me wrong. This is a cheap system to install especially for the
home installer and you will recover your purchase costs very quickly. Personally
I would recommend it only for the 4 cylinder cars and I have subsequently spoken
to LPG installers who have all said that they would not recommend this solution
for the 24V - in fact nearly all refuse to even take on a 24V because of it's
complexity.
I approached Gas Power
UK in Exeter with the 24V and the owner, Steve Fricker, is very approachable
and his staff lack the usual 'attitude' of mechanics, being friendly and helpful
(they let me have access to the car to spray cavity wax when it was up on the
ramp).
After taking a look at the car, Steve acknowledged that it was going to be
complex and suggested that the Romano Sequential Vapour Injection system was the
only solution that would work effectively.
The SVI system is the latest development in LPG conversions, and uses an
injector per cylinder approach that mimics modern multi point fuel injection
systems as fitted to the Scorpio. The injectors are fired by an ECU (Computer)
based upon an Engine Load map which is learnt by the ECU during setup. The
actual fuel injected is refined by the ECU measuring the exhaust mixture through
the Lamda sensors, ensuring that the mixture is correct at all times.
Because it injects fuel into the inlet valve for the cylinder, the SVI
solution would not be affected by the inlet tract issues of the 24V where the
VIS system changes the air dynamics at different engine loads, nor does it fill
it with LPG/Air mixture. As the petrol injectors are primed with fuel at all
times, switch over between LPG and Petrol is instantaneous without any loss of
power.
Performance is said to be identical to petrol and the economy should be only 10%
lower with LPG.
Installing the Romano SVI
The system comprises a rear boot mounted LPG tank that is highly damage
resistant. I went for the doughnut tank that was to be installed in the spare
wheel bay. I have noticed that other vehicles have had the tank installed but
that it stood proud of the boot floor and required half of the floor to be at a
different height. Gas Power UK took a grinder to the boot, removed a section and
welded a new plate in complete with special bolts that are used to retain the
tank. It is certainly a neat job as you can see.
The next items to be installed were the injector pipes. These are fitted by
removing the inlet manifolds and marking and drilling the manifolds to take
brass pipes. The positioning of these are critical to the balance and overall
performance of the system and a lot of time was taken ensuring that they were
not only symmetrical, but also that the injectors and feed pipes could be
located around the reinstalled manifold. New gaskets were ordered and fitted
both for the manifolds as well as the O rings used where they join.
Next the two vaporizers were located and installed. The LPG is piped as a
liquid to the engine bay through a copper tube where it enters the vaporizer and
is turned into a gas. As LPG liquid turns into 250 times it's volume as a gas,
it is impossible to inject LPG in liquid form reliably into an engine as the
quantity would have to 250 times more accurate than injecting a gas.
Anyone who remembers their GSCE Physics will know that when the liquid turns
into a gas it cools down and so to prevent freezing the vaporizer is heated
using the engine coolant. This was taken via a T piece installed into the heater
pipework. After calculations were made, it was realised that a single vaporizer
would be on the limit when feeding the engine under maximum load and so a
decision was made to install two, one for each bank. To prevent the injectors
from becoming clogged, dual inline filters were added.
Next came the control system. The ECU was installed behind the left hand lamp
cover which made for a hidden and very neat install. Electrical connections were
made to the coil via a diode pack as the coil on the 24V is actually 3 coils in
one. One of the vaporizers was fitted with a coolant temperature sensor and a
solenoid valve added to switch off the gas supply when running on Petrol. In
order to ensure that the 24Vs EEC-V was not throwing up errors all of the time
when running on LPG, an Emulator was installed between the Petrol injectors and
the injector leads. When running on LPG this fools the EEC-V into thinking that
the petrol injectors are firing normally. An interior switch was added in the
area underneath the 2007 Radio fitted to my 95 Scorpio (this can be located
wherever convenient). It comprises a Gas/Petrol switch and a 5 LED gauge showing
LPG quantity remaining. Finally the wires to the two Lamda sensors were split
and a feed to the ECU spliced in in series. This enables the LPG ECU to measure
the exhaust mixture and to compensate (trim) as needed.
Finally the entire system was ready for testing and a small amount of LPG was
added to the tank and each joint tested for leakage, both statically as well as
moving pipes etc to simulate vibration. When each joint was shown to be gas
tight the car was started on Petrol and brought up to temperature and then
switched over to LPG. Using the Romano diagnostic software, each connection and
sensor was tested and the basic map established at idle. We then took the car
for a mapping session.
Mapping comprised driving with a set number of styles, ranging from high
speed, high load through gentle acceleration and deceleration with a passenger
driving the laptop taking measurements. The resultant map was then used to
calculate the full range of fuel/load maps that are used by the ECU to inject
LPG and which are then trimmed by the information from the Lamda sensors.
I then took the car for an 850 mile round trip to Scotland for the weekend to
identify any problems.
Driving impressions
Firstly I have to say that I am absolutely amazed by the quality of
installation and the drivability of the car. Full acceleration seems smoother on
LPG and there is no hesitation when switching between LPG and Petrol. I have
noticed that coolant temperature is critical to running on LPG and I have
requested that the initial temperature when LPG starts to be used be raised by
10 degrees to 35 degrees to prevent stalling on cold mornings.
I believe that the improved smoothness is a result of gas being injected
rather than a liquid being injected which is the atomised by the injector. As my
vehicle has done 114k miles, the petrol injectors must be quite dirty (despite
regular injector cleaner) and their atomisation is probably less than perfect.
However when injecting LPG it is all gas and so the flame front within the
cylinder must be better - result is smoother running and in particular, smoother
acceleration.
Fuel economy was very impressive too - on short journeys I have been getting
19 on Petrol but over the weekend I was seeing 22 on LPG (although the first
mile is still run on Petrol which will affect the readings). On fast motorway
routes (based over 800 miles of motorway) I saw an overall consumption of 24mpg
(25 on petrol) and that included 2 hours stuck on the M6 at Birmingham. I really
did not expect that sort of economy.
The only problem so far is that the fuel gauge (the 5 LEDs) is very
pessimistic, showing empty after just 140 miles whereas with a 12 gallon
capacity it is capable of at least 240 miles - I am just a little concerned
about running out of LPG as with an automatic it is a somewhat fraught
experience when the engine stops and you have to restart it whilst still driving
:)
 |
Dropping the fuel tank to cut the bottom of the spare wheel well
to install the doughnut tank |
 |
Tank installed showing the virtually flat boot floor |
 |
With the rear carpet down you would not know there was a tank
underneath. Meets my wife's requirement that it would not take up valuable boot
space. |
 |
The new LPG filler installed |
 |
Dismantling the inlet manifolds to drill and tap them for new
LPG injectors. |
 |
The engine in it's dismantled state. New gaskets and O rings
were fitted as a matter of course. |
 |
Drilling and tapping the manifolds |
 |
Note the accurate positions of the injection pipes, keeping them
as symmetrical as possible to ensure an even injection of LPG across all six
cylinders. |
 |
Installing the emulator loom onto the petrol injectors |
 |
Installing the twin vaporisers - one with a coolant temperature
sensor and mounted above the exhaust manifold to keep them nice and hot. |
 |
Installing twin inline filters to ensure that the injectors stay
clean |
 |
Wiring up the system |
 |
Final manifold installation |
 |
Interior fuel selection switch with LPG gauge |
 |
Final finishing (annotated diagram) |
 |
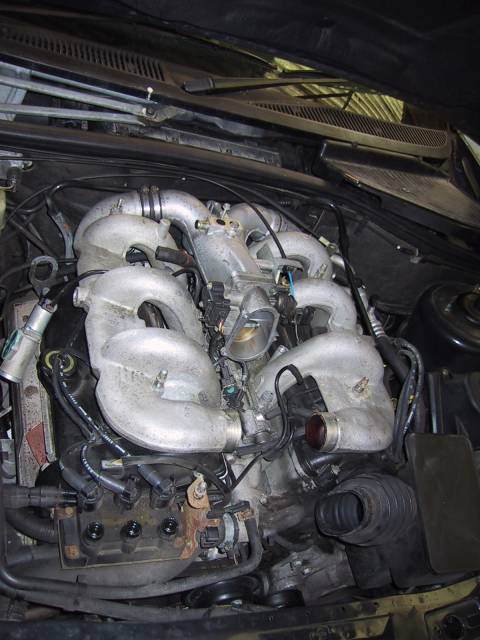
The finished article. The only remaining job is to modify the
engine cover to fit back onto the engine |
|