Gone are the days where the only piece of electronics
you needed was a multi-meter. Even going to Halfords and buying one
of the vehicle diagnostic contraptions won't help the Scorpio owner.
With the development of the PCM (Powertrain Control Module) Ford must have
thought that the days of servicing your own car were over - but as the vehicles
get older and enter 'classic' status the average owner can no longer afford Main
Dealer prices and has to resort to their own efforts to look after their cars.
ENGINE MANAGEMENT
Firstly let me explain a
little about PCMs. The engines of old used to rely upon default
settings for the amount of fuel delivered to the engine, the spark
advance, dwell angle etc Most things were controlled mechanically -
such as the SU carburettor of the A series engine fitted to many
British cars up to the last Minis, which relied upon a tapered needle
rising and falling in a tube (jet) to control the fuel flow and the
Distributor that used weights being spun to control spark advance.
Everything was a compromise and everything went 'out of tune' when
it started to wear.
Not surprising therefore that my first Austin 1300
with twin SUs only managed 28-32mpg whereas a modern 1.4L engine can
achieve 50+ mpg - how do they achieve this?
The answer is the PCM - a
32-bit processor capable of 1.5 million instructions per second. There are lots of sensors mounted around the engine that
detect the flow of air into the engine, the position and rate of
change of the throttle, temperatures of coolant and air etc - in
fact up to 60 sensors on a modern engine, and the PCM measures all of the
values and decides how long to switch on the fuel injectors - longer duration injects more fuel. Finally a sensor in the
exhaust (called the O2 Sensor) detects how much oxygen is left in
the exhaust gas and tells the PCM - this is called a 'Closed
Loop' state and enables the PCM to make allowances for wear and
changes to the engine during it's life - always providing the right
amount of fuel for the situation.
However this is all well and good whilst the sensors
are all working correctly - when one of them fails the PCM gets
confused. Driven by the American anti-pollution legislation,
On Board Diagnostics requires that sensors and actuators controlling pollution
monitoring must be checked regularly and codes generated if there is a fault.
OBDll went one stage
further and required the PCM to actively monitor and test the emissions-related
elements. Since the legislation was due to take effect in 1996 and the 94
Scorpio was one of the first vehicles to have the new EECV powertrain control
module - the Scorpio benefits from the OBDII port, even though the vehicle
doesn't fully comply - there is no MIL (Malfunction Indicator Light), for
example.
Ford therefore included the
full OBDII diagnostics (Diagnostic
Trouble Codes - DTCs) into the PCM to help identify failed sensors
and if you can read the PCM you can see if there have been any
faults recorded - the PCM is clever enough to identify faults that
occur every time you start the engine and faults that only occur
occasionally.
What can you do with the PCM?
Well without
the right tools nothing - it's a sealed box and a simple 16 pin
connector, called the DLC - Data Link Connector. In this case the 'right tools' are a special cable and
connector, a laptop computer and a piece of software. This then
connects to the PCM via the diagnostic connector and reads the
information - it can be used to read and then reset any fault codes
in the PCM and also to read the sensor values that the PCM reads
(Data Logging).
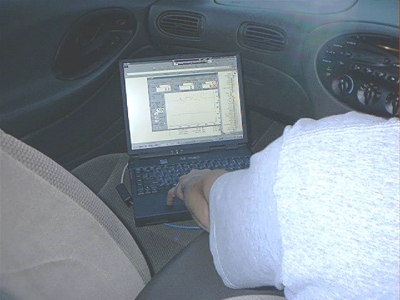
So you can connect up the Laptop and start the
software - with a colleague in the passenger seat you can monitor
say Vehicle Speed, Throttle Position, Spark Advance and Oxygen
sensors as you drive. When you stop you can then replay the data
from your journey and check for values that don't look
right.
I investigated many tools that would do the job but
all were too expensive, ranging from $300 to over $2000. Some only
gave you the DTCs whilst others were designed to change the PCM
program (dangerous without a rolling road!). All of them were only
available from the US - it seems that their freedom of information
Laws help owners get access to all of the data needed from the
Manufacturers. Eventually I tracked down the OBD-2 Scan Tool from
Alex Peper (http://www.obd-2.com/) who claimed to have a low
cost interface that should work with the Ford Scorpio. Taking a
chance I ordered one and a week later it arrived - total cost was
$122 for the unit and another £29 for Customs, VAT and Parcel Force
charges.
Pictured below is what you receive - it's not as
professional looking as some but for the price it's a bargain and
the software is worth the price on it's own. If you want to order
one then mention it's for the Ford Scorpio and ask for the FORD PWM version
(NOT the ISO one).
Note: Order your leads directly
from Alex at http://www.obd-2.com/ and mention the Ford Scorpio
to obtain the correct version of the lead.
NOTE: The 2.9 12V Scorpio was fitted with the older
EEC-IV PCM and is NOT compatible with OBD2 - See the EEC-IV Code reader
for a suitable fault reader for this vehicle
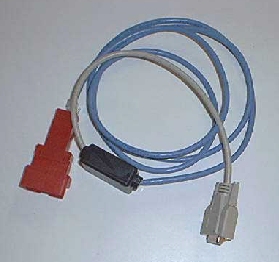
 The black box houses the electronic
circuitry that translates the messages from the car's
computer. The grey cable is a standard PC serial port cable
and the blue cable has an OBD-II connector on the end which connects to the
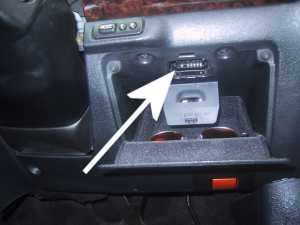
terminal in your Scorpio. The OBD2 connector is in the coin box to the lower
right of the steering wheel behind a small flap in the roof of the compartment.
No tools are needed to access it.
The black box houses the electronic
circuitry that translates the messages from the car's
computer. The grey cable is a standard PC serial port cable
and the blue cable has an OBD-II connector on the end which connects to the
terminal in your Scorpio. The OBD2 connector is in the coin box to the lower
right of the steering wheel behind a small flap in the roof of the compartment.
No tools are needed to access it.
I used a Pentium 333 MHz laptop with 64 MB of ram but
Alex claims that any laptop (mono or colour) will work or you could
use a desktop PC if the cable reached. The software was designed to
work with 486s and older operating systems like Windows 3.1 (can you
remember that far back?) but is also compatible with 95,98,ME and
2000. Most current computers will run the software with no problems.
I downloaded the VE1-OBD-2 software before the unit
arrived (from http://www.obd-2.com/) as you can access some test
files to get acquainted with the software but the real fun started
when the unit arrived and I sat in the car in the driveway.
You can imagine my disappointment when it failed to connect!
I need to mention that the one area that I feel the
product let's you down is in the Help - don't get me wrong as Alex
will reply to every email within 2 days and is always very helpful,
but the Software's Help files assume that you are very computer and
OBD-2 literate and most of us aren't.
I eventually tracked the problem down to a poor fit
between the OBD-2 connector and the diagnostic port - a push and a
wiggle eventually got the two talking.
USING THE
SOFTWARE
Now, remember that this software was designed for the US spec
Ford vehicles and so we had to expect some 'issues' when using it on the
Scorpio and I'll highlight these as we go through the features.
The software has a very techy feel with computer terms
like "addresses" and "modes" used throughout. You need to
persevere because eventually you get the hang of what you can ignore
and what's important. You need to install the VE1 OBD-2 software
(Alex calls it a browser) from his web site at http://www.obd-2.com/ and also
download the Enhanced Ford data file from the site and place the
file in the same folder as the software. Start the program by
clicking on the OBD2.EXE icon.
INFO Screen
The various screens are accessed from the Tab
buttons and the first screen that comes up is the INFO screen.

The upper text box is for you to enter details of your
vehicle - this is used in the data logger so that when you replay
data you can see which vehicle it refers to. On the right the VIN,
CIN and CVN numbers are collected from the PCM in US Spec cars but
not in the Scorpio - you can enter your own VIN if you wish but I
never bothered as it has no useful purpose.
The Stamp button is for you to enter a description of
a particular time point. So for example you could be driving along
when a misfire starts - shout 'misfire' to your passenger who hits
the STAMP button and enters 'Start of Misfire' as the comment. When
you play the data back you can identify the point when the misfire
occurs and analyse the data from the sensors.
The lower window displays the communications between
the software and the car - most of it is computer speak and as long
as the unit is connected OK then it can be ignored.
Status Screen
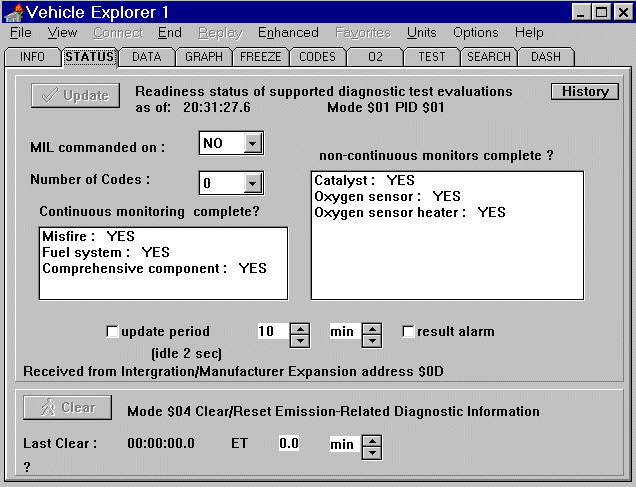
This screen tells us the status of all the OBD-II
monitor tests. This is also the screen where you can see if
there are any Diagnostic Trouble Codes (DTCs). In this case, the
Scorpio did not have any codes stored. If it did, we could go
directly to the CODES screen to get the complete listing. There is also a button on this screen which you use to clear any
current codes. The button in this case is not activated since
there are no codes to clear. The MIL light is an indicator used on
US Spec cars to light a dashboard light that says 'Check Engine' -
Scorpios don't have one.
Continuous monitoring refers to all tests that the PCM
undertakes whenever the engine is running - non-continuous tests are
those that only occur after certain conditions have been met -
engine at working temperature etc. You may see NO in these results
if you have only used the car for a short period and the engine has
not yet met the criteria for all of the tests to be run.
Data Screen
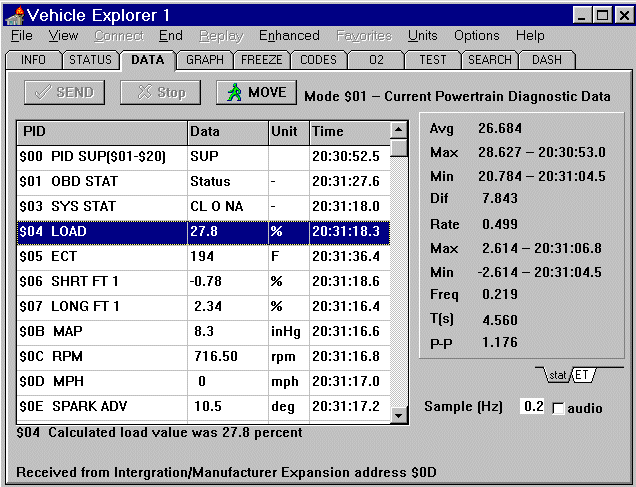
This screen is shown populated with data - when you
open it to start with it is empty apart from 3 values - ALL data,
PID possible and $00 PID SUP($01-$20) - I told you it was rather
confusing.
ALL data refers to a REQUEST to the PCM to send all of
the data (names and current values) to the software whilst PID
possible tells the PCM to send the names of all of the data names
only. You have to highlight the value and click SEND to action the
request.
When I hit the $00 PID SUP($01-$20) button however I
received several errors - this is apparently the problem between the
UK spec cars and the US spec software - some of the values are not
supported by the PCM and a dialog window opens to say PID $xx Not
Supported - you can click OK to close the dialog each time but it's
very annoying.
It's far better to use the PID Possible
to see the various options and then select one of the values you
wish to see and then click SEND. A description of the
parameter is displayed at the bottom of the screen and again
requires the operator to have some basic understanding of the Engine
and it's parameters.
To the right of the data screen, you can see a
statistics tab that shows all the important statistical figures for
whatever parameter is highlighted in the list: in this case it is
the load value. There is also an ET tab which allows you to
control the recording of the scan data as if you were using a
stopwatch. You can set start and stop times and even lap
times. A really neat feature. And you can also control
the sampling frequency (how many data points the unit records in a
given amount of time). And lastly, a really clever feature is
the audio checkbox. If you check this box you can keep your
eyes on the road and monitor the parameter of interest as a sound
signal. The frequency of the sound goes up and down according
to the value of the parameter. In this case, if the load value was high I would
hear a high frequency sound.
Graph Screen
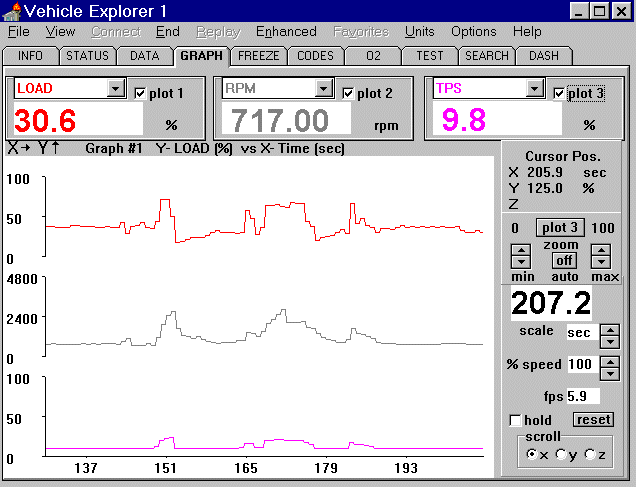
This is where the diagnostic power of the software
becomes apparent. You can plot up to three different
parameters at once and compare them to one another to see if they
are responding correctly. In this case, I plotted Load, RPM,
and TPS versus time. If you take the time to go through this,
you can reconstruct the driving conditions very easily.
You could also have multiple parameters graphed together on each of
the three plots. You can also plot one parameter versus another if
you click the circle next to the "z" in the lower right
corner. The limits of your diagnostic power are literally
endless. You can use your imagination to create strategies to
hunt down complicated driveability problems. Note that for the
parameters to become available in the GRAPH screen you must have
selected them in the DATA screen first - otherwise the drop down
choices are empty.
Freeze Screen
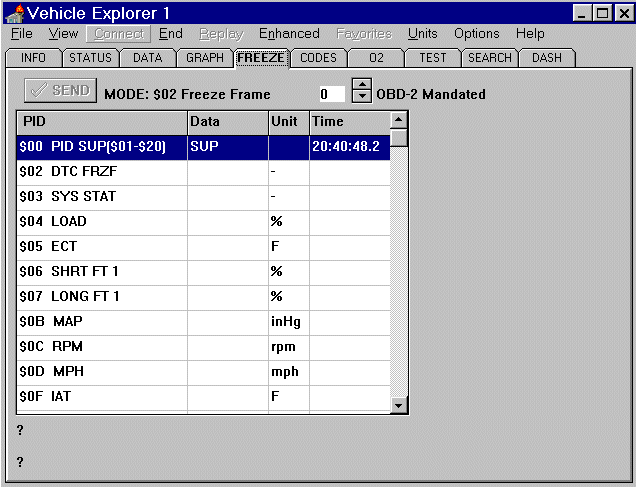
This screen is where you can view a freeze frame
snapshot of the data parameters when an emission related trouble
code was set. In this case, there weren't any codes stored so
the screen is empty and I don't know if this feature is enabled on
UK spec cars. It is designed to tell the operator of the parameters
of the engine at the point at which the fault condition occurred.
Codes Screen
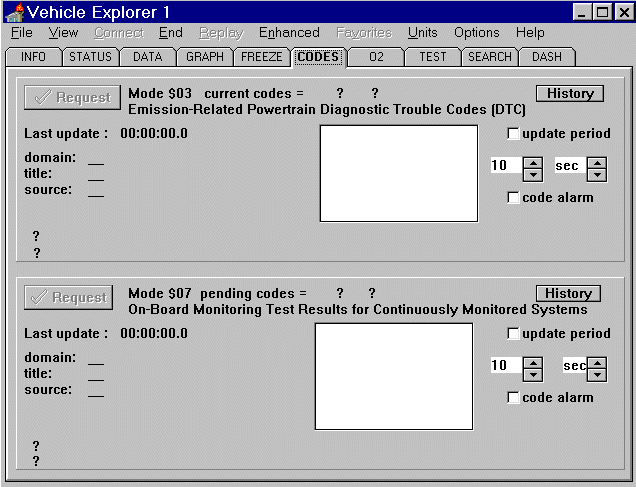
This screen is where you can request and list out any
codes that are stored or pending. As mentioned previously in
the STATUS screen section, this is where you would go if any codes
were indicated. You can also press the history buttons to see
what codes have been present and when they were cleared etc. This may help give you an idea of what problems existed in the
vehicle's recent past.
O2 Sensor Screen
This screen is where you could monitor the O2 sensor
output. However this feature is NOT SUPPORTED on the Scorpio.
If you want to monitor O2 sensors then you can request them to be
monitored in the DATA screen and plotted in the GRAPH screen
but this O2 Screen cannot be used.
Test Screen
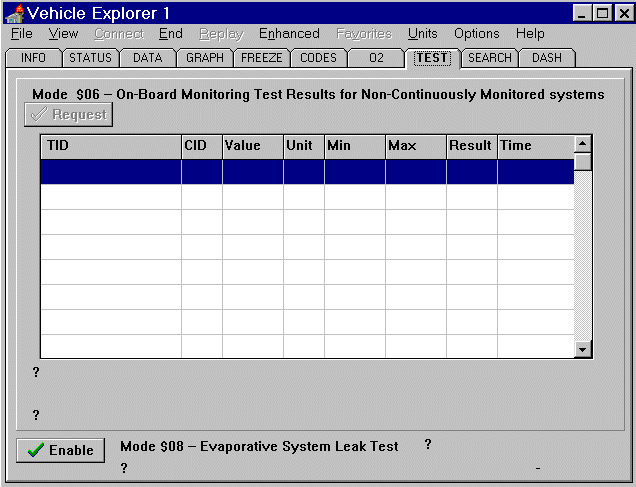
This screen is where the output for tests that are not
conducted continuously are displayed. The tests that are
available depend on the particular manufacturer and again the three
options of ALL data, TID Possible and $00 SUP($01-$20) are provided
- use ALL data to see what is available for the Scorpio.
Search Screen
Do not use this page unless you fully understand the
workings of the PCM - it is designed for raw access to the data
storage area of the PCM
Dash Screen

This is my favourite page. You can actually set
up a virtual dashboard of gauges for whatever parameters you
want. I've chosen VS, RPM, LOAD, ECT, SFT1, and LFT1 but you
can choose whatever you want to look at. You can even change
the gauges appearance and min, max, and redline values. This
is an appealing alternative to the graph screen when you are
comparing sensor values. Wouldn't it be cool to build a display into
the car that allowed you to select whichever virtual graph you
wanted - in fact the Nissan Skyline GTR has exactly that feature.
Enhanced Screen
By selecting the Enhanced Menu option and using the
Possible command you can review all of the Ford specific data vales
that are available - these were designed for US Spec Fords so don't
be surprised if you get a Mode $22 Not Supported error in a dialogue
when you choose any particular parameter. It simply means that the
PCM did not respond to the request. Also you may see a * appear in
the Data box rather than a value - that means that the PCM responded
to the request but returned no value - again it was not supported in
the Scorpio.
Scanning
When you connect up the laptop and run the software
for the first time you will need to hit the connect menu button. As
soon as you are connected the system starts recording - as you add
each sensor in the DATA screen the data is added to the recording at
the time point that you started measuring it. When you disconnect
the software asks you to choose a filename to store the data in. You
choose a memorable name and it records all of the data which you can
then access by using the REPLAY menu item. If you selected an
Enhanced data then you need to open up the Enhanced page to see the
results - NOTE that enhanced data is not available for use in the
Graph screen. (If you wish you can use the Export feature in the
File menu to save the Data file as a CSV file and import it into
Excel to graph the data yourself).
The real benefit is that you don't have to do your
diagnostics while you're under the bonnet or in the driver's
seat. You can simply record everything of interest and store
it. Then go sit down with a clear head and meticulously go
over what you've recorded to find the problem using the graph screen
and dashboard to see what happened.
Fault Finding
There are a couple of faults
that I came across with the software.
1. Failed to
connect
This was due to a poor connection between the cable and
the diagnostic connector - set the laptop to continuously try and
connect and wiggle the connector - it should connect OK. If not then
make sure that your ignition is on and that the software connects to
the Port of the laptop by checking the messages in the INFO screen.
2. Dialog window displayed saying Mode #xx Not
Supported - caused when the PCM did not respond to a request. If you
select ALL data then the software cycles through each data request
and if the PCM did not respond the dialog window is displayed which
is very annoying. Select individual parameters instead of 'ALL'
(find them first using the PID Possible command) and make a note of any that
cause this problem and don't use them in future. It is
possible to configure the software to be monitoring the values that
you are interested in and then set a Favorite - then when you return
to the software in future and open the Favorites it presets the
data requests to those that you saved previously.
3. Data Underrun or lost data values
The PCM
connector accesses the PCM and it's sensors over a 'BUS' which is
also carrying the sensor values to the PCM - it can get a bit
congested if you are requesting lots of data values and you will
notice the refresh rate for any one data value drop (it can normally
achieve about 4 requests per second for a single value) and also it
will drop data values with an error in the log file saying Data
Underrun or Data Len errors. Unless these cause a real problem over
a long period of time then don't worry - you can try setting the
timeouts to be 3 and the Ford PWM box to be 200 in the
Options/Gateway menu item and that can be beneficial.
4. Software crashes
Has happened occasionally that
the software gets confused and faults although it still seems to
record the data ok. If it happens to you then record what was
happening and email Alex Peper with the details.
Plusses and Minuses
For those of you who want a quick scorecard, I'd have
to summarize it like this:
Plusses
Compact size and portability
Ability to easily
read and clear codes
Datastream access including graphing and
dashboard style gauges
Free future software
upgrades
Data Logging (By far the most valuable
feature)
Low Cost
Excellent software package
Minuses
Needs a Laptop with a serial port
Quite a
technical product
Can be a little buggy
Overall the tool is worthwhile for anyone who feels
competent to diagnose their own problems rather than resort to the
Ford Dealer. I had problems with my EGR system and even Ford could
not diagnose it with their WDS but my laptop eventually tracked it
down to a leaking EGR pipe that was weakening the mixture.
For detailed analysis of trouble codes
and sample scans go to OBD Menu
