| Heater Control Bulbs (Low Series - non Climate
Control) |
| 1. Pull off the heater control knobs. |
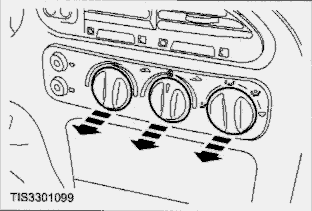 |
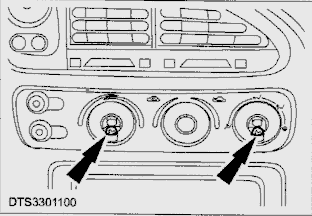
2. Remove the two screws securing the heater control bezel.
CAUTION:
Only prise out the bezel from the air distribution control switch side of the
bezel to prevent breakage of the locating tang at the opposite side.
|
 |
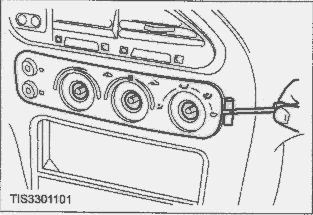
3. Prise out the heater control bezel.
Use a pad between the screwdriver and the surround to
prevent damage. |
 |
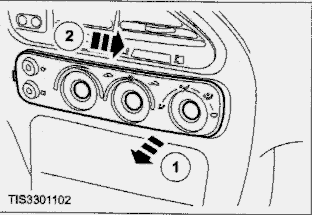
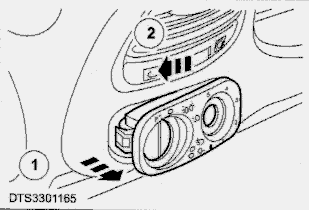
4. Remove the heater control bezel from the instrument panel
facia.
1. Pull out from the bezel.
2. Slide to one side to disengage the locating tang.
|
 |
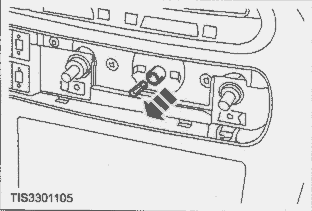
5. The heater control has a bulb mounted inside the switch.
Change this bulb.
Remove the appropriate bulb.
Twist the bulb/holder anticlockwise to remove.
Finis 6 579 838 (1 off)
|
 |
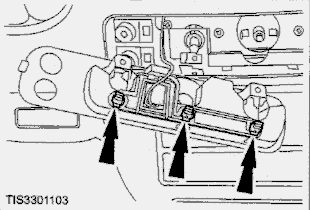
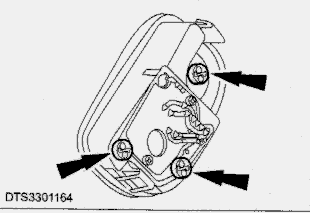
In addition, there are three heater control bezel bulbs which
can be changed. They are accessed at the rear of the bezel.
Finis 1 024 681 (3 off) |
 |
Heater Control Bulbs (Hi Series - with Climate Control) |
The High Series Scorpio bezel is different. Instead
of a blower switch mounted in the dash, the Climate Control is a single unit
which incorporates the blower controls and the side temperature displays. The
bezel must be unclipped from the dash to gain access to the bulbs - there are
three.
If there are no other bulbs to change in the instrument panel, then the CC
control bezel can be removed on its own leaving the fascia undisturbed - but
great care must be taken not to scratch the 'wood' or surround while releasing
the bezel.
|
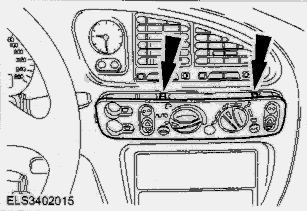
There are no screws in the front of the CC bezel as there are
above. The bezel locking tabs are above and below the Recirc and A/C buttons.
Use a flat instrument to press down into the locking tabs, while prising the
bezel outward.
Once the bezel is free, carefully remove the ribbon connector and go to 7 below.
|
 |
Remove the Fascia |
If there are other bulbs to be changed as well, it may be easier to remove the
fascia, leaving the CC bezel in place.
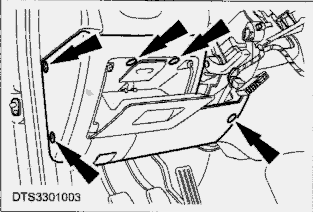
1. Remove the lower driver's fascia panel by removing the screws shown.
Detach the trip computer multiplug connector if fitted, and the data link
connector. This is only to prevent damage by straining these connections.
It is not necessary to disconnect the hood release cable. |
 |
| 2 Pull off the heater control knobs. (Note: low series bezel
shown) |
 |
3 Remove the radio/cassette unit. Make sure you have the KeyCodes!
|
4 Detach the instrument panel fascia (six screws).
Lower the steering column and draw it forward on the reach/rake adjustment.
Although the steering column shroud is shown removed, in practice this is not
necessary exercising care and using the steering on lowest/furthest rake/reach.
|
 |
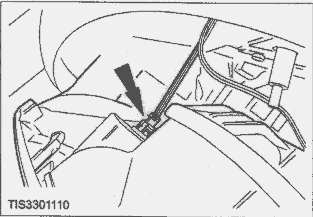
5. Disconnect the clock multiplug.
Ease the instrument panel facia forwards to disconnect the multiplug. |
 |
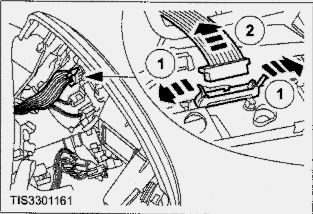
Hi - Series vehicles only
5a Disconnect the heater blower motor switch assembly multiplug.
1 Release the multiplug retaining clips.
2 Disconnect the multiplug.
|
 |
| All vehicles |
|
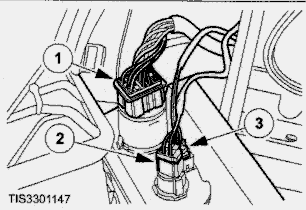
6. Disconnect the multiplugs and remove the instrument panel
fascia.
1 Light switch.
2 Headlamp levelling switch (if fitted).
3 Bezel Illumination.
|
 |
6a Disconnect the multiplugs to the heated windscreen and rear window (if
fitted).
|
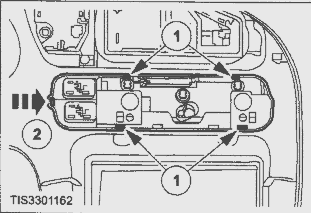
| 7. The bulbs for the climate control unit are mounted in the
front of the unit. (3 off 1 024 681) |
 |
Instrument Cluster
Now the fascia is off, this is the time to change the bubs in the instrument
cluster! |
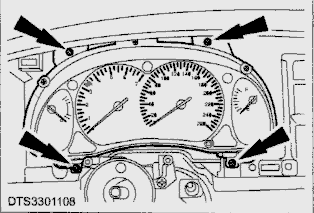
| 1. Remove the four screws shown. |
 |
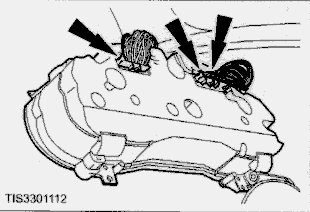
2. Ease the cluster forwards and remove the two multiplugs from
the rear.
NOTE - DO NOT PLACE THE CLUSTER LENS DOWNWARD -
keep it upright |
 |
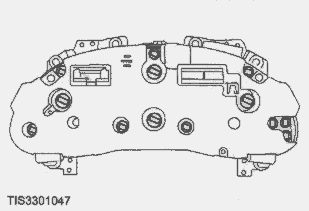
3. Keeping it upright, exchange the bulbs in the back of the
cluster. Two types of bulbs are shown fitted here:
Larger bulb Finis 6 329 989 (4 off)
Smaller bulb Finis 7 096 694 (6 off) |
 |
Clock |
|
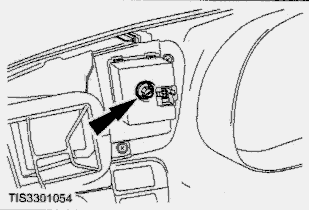
There is a light in the clock, too. Surprising, with all the electronics,
including ground-breaking multiplex systems, that Ford should choose an analog
clock, but it keeps very good time. The bulb is in the rear of the clock and you
can change it now that the fascia is off.
Finis 6 097 990 |
 |
Lighting Switchgear
The bulbs in the light switch can be changed without removing the fascia. There
are two bezels for the Scorpio, one with headlight levelling, and the other
without. |
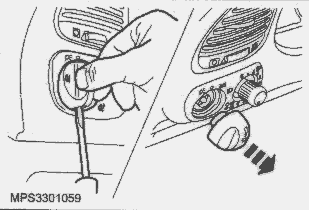
1. Remove the light switch knob.
Using a small screwdriver depress the locking detent and pull off the switch
knob. |
 |
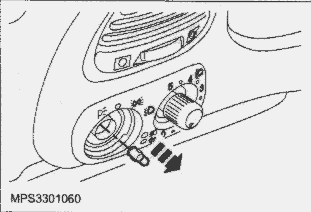
2. Remove the bulb.
Replace the bulb, Finis 1 505 258 |
 |
The switch bezel has other bulbs installed at the rear to illuminate the bezel
options.
|
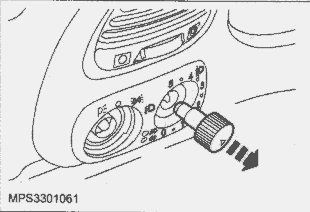
4. Remove the headlamp levelling switch knob (if fitted) by
pulling it off.
|
 |
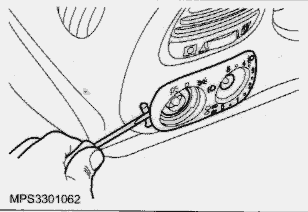
5. Prise out the switch bezel.
Prise out the bezel on the light switch side only.
Use a pad between the screwdriver and surround to prevent
damage. |
 |
6. Remove the switch bezel.
1 Pull out the light switch side of the bezel.
2 Slide the bezel sideways and remove.
|
 |
7. Remove the appropriate bulb.
Twist the bulb/holder anticlockwise to remove.
Finis 6 579 838 (3 off) |
 |
| |
|

