![]()
![]()
|
|
|
|
|
|
|
Last update: 08/03/2005 |
|
|
|
|
|
|
|
|
|
|
Using On-Board Diagnostics 10 Easy Steps to an OBD Scan
1. Turning On Make sure the OBD lead is not connected to the serial port, and then turn on laptop (or PC being used).
2. Connect Lead When laptop has fully completed booting up, connect OBD lead, plug it into the OBD port on the Vehicle. Turn ignition ON
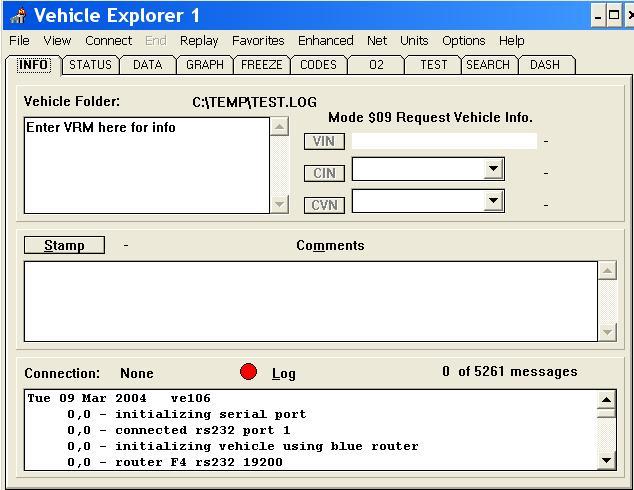
3. Enter Vehicle Info
Click on the INFO tab: type in the registration number of the vehicle being checked into the Vehicle Folder box. This is important, it prevents confusion later. NOTE - the vehicle details will not clear on a new scan, YOU MUST ENSURE that the vehicle details are correct.
4. Connect with the Vehicle PCM Click the Connect button on the top menu. A dialog box will open when Explorer connects with the PCM.
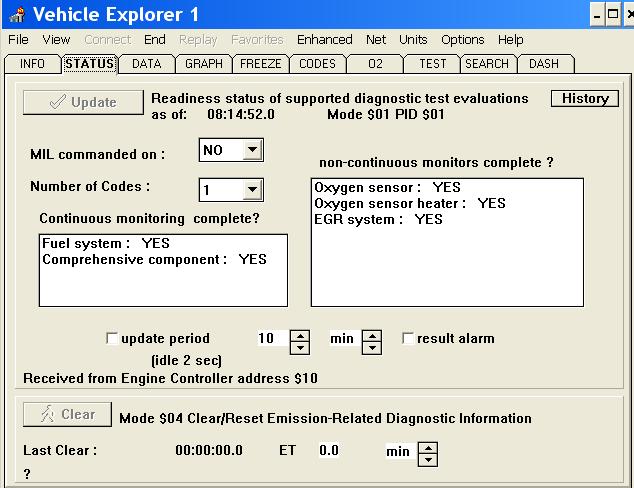
5. Check for OBD System Status
Click on the STATUS tab, and then click on Update button. Note the result on the MIL Commanded On box - should be NO - and the Number of Codes box should be 0 (zero). If Codes are 0 the Continuous monitoring complete? box should show:
and the non-continuous monitors complete? should show:
(See screenshot above)
If this is all true then the OBD Monitors have passed all their tests and there are no problems discovered. Click on the Stop button on the connection box and name the file. (The system will prompt with a filename of Scan, but this is of limited use when you have 50 scans saved! Try to use something meaningful.) This file will be saved and it can be retrieved at any time and played back using the Replay option on the top menu.
6. DTC Codes are present. If MIL commanded on: YES - then there is a serious OBD concern affecting the catalyst(s) and/or emissions and Code will show at least 1. On a MIL-equipped vehicle the Malfunction or Check Engine light would be on and the vehicle would fail an MOT, but the Scorpio is not equipped with this light.
If MIL commanded on: NO - and Code shows 1 or higher then there is a fault but it is not so serious. In either case the Diagnostic Trouble Codes (DTCs) need to be retrieved from memory.
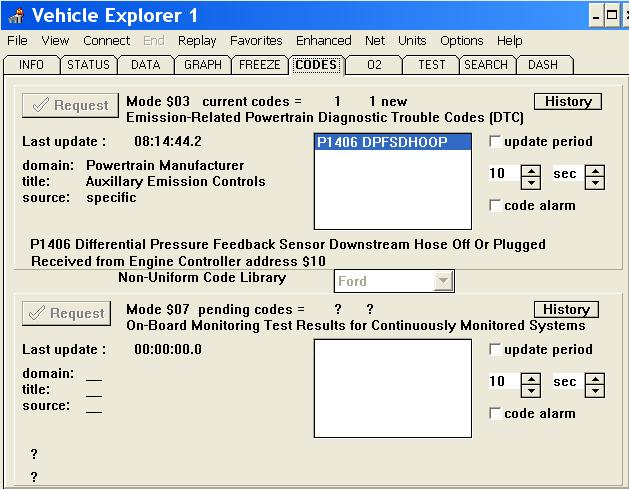
7. Retrieving OBD DTCs from Memory
Click on the CODES tab. You will see the DTC in the box highlighted in blue. Beneath the box is the text explanation: in this case P1406 DPFS hose off or unplugged. Check on the OBDinDetail page for information and an explanation on how to repair this.
8. P1000 retrieved If the single DTC code is P1000 this shows that not all of the system tests are complete. Either there has been a battery disconnect or DTCs have been cleared from memory. If P1000 is found then some of the Monitors on (5) above will show NO. The vehicle should be checked again after a few days to make sure that no new codes have been generated, or take it for an OBD Trip and check the system again, but otherwise the P1000 code can be ignored.
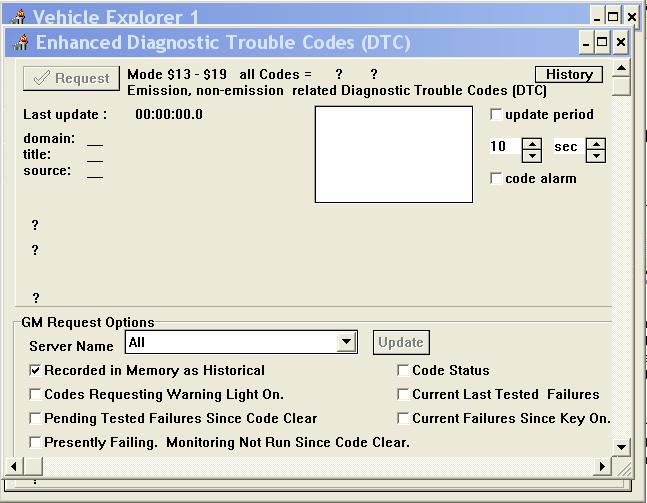
8. Checking for Enhanced DTCs.
As well as OBD codes, there may be Ford-only codes in memory and these can be requested while the main Codes page is selected, using Enhanced on the Title menu. A separate Enhanced Diagnostic Codes page opens. Click on the Request button and after a few moments the PCM will reply with any Enhanced codes in memory. These codes will probably report the same concerns as the OBD with a slightly different number - beginning with a 1 instead of 0. In this case the P1406 is a Ford code anyway.
9. Datalogging You can record sensors as the engine runs by clicking on the DATA tab. Click on the PID Possible option and then click Request. A list of sensors then returns from the PCM. Click the one you want to watch and click Request again. The sensor will continue to be recorded until you click the Stop button. Note that the more sensors you select for recording, the slower the refresh rate. For time-critical sensors, such as HO2S, select as few as possible. While on the DATA page, if you select the Enhanced option, this time you will see an Enhanced Data box, from which you can select Pid possible and then obtain a list of Ford-Only addresses. These show all of the sensors and actuators connected to the EECV, rather than just the OBD ones on the DATA page. See the Abbreviations page for a list of sensors.
10. End the Scan Click on Stop on the connection dialog box and the File Save box opens. Enter a meaningful name for the scan (VRM and ddmm of the date would be good) and then click save. That's it - you have completed a DTC check of your vehicle.
Note: if your Vehicle Explorer looks different to those pages above, you probably have an older version. You can download a more recent program from OBD-2 EricR |
||
|
|
|
Copyright © 2004 www.fordscorpio.co.uk |
|