|


|
|
| Vehicle |
Cosworth 24V: DOHC models |
| Year |
All |
| Mileage |
Any |
| Repair Cost |
£49 approx |
| Repair Part(s) |
Fuel Rail Pressure Regulator |
Symptoms: Engine difficult to start when hot or recently turned off. Smell of petrol when
starting. This happens whether or not the MAF is disconnected.
Long Term Fuel Trims (LTFT) show
severe negative at idle. MAF cleaned and ok.
Vlad is the owner of a 24V saloon in Bucharest, Romania. On the
Confidential List
he reported that the engine had always been difficult to start when it was hot,
but that it would start and run fine when it was cold. This problem had been
getting steadily worse as time went by, until he was now unable to make a short
run in the car at all. After purchasing an OBD lead he was able to provide a
scan and diagnostic trace, showing only an EGR error. The Long Term Fuel Trims
(LTFT1 & 2) were both showing a severe negative trim. This might indicate a
problem with the MAF, but he reported that disconnecting the MAF sensor made no
difference to the symptoms. The MAF was thus ruled out and after discussions on
the Confidential List, Vlad decided to change the Fuel Rail Pressure Regulator.
These are his instructions and pictures about how to replace the 24V Cosworth regulator.
For other petrol models, see Fuel Rail
| 1. Relieve the pressure from the fuel rail by removing the
fuel pump fuse (Fuse 42 in the Auxillary fuse box) and running the engine
until it stops. Remove the engine cover 2. Remove the
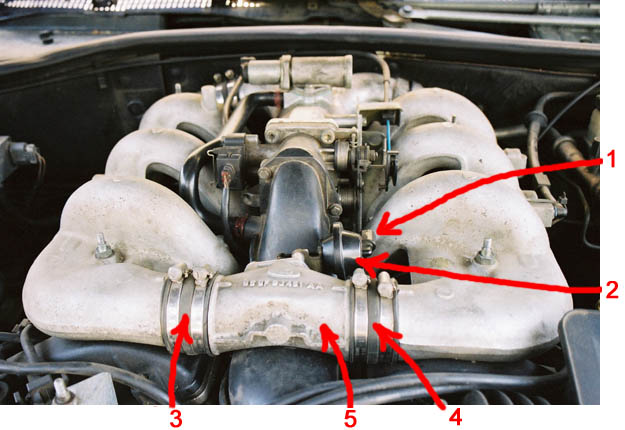
vacuum hose (1) from the VIS actuator (2)
3. Slacken the collars (3) and (4) situated on each
side of the VIS valve (5).
4. Remove the VIS valve (5).
|
 |
|
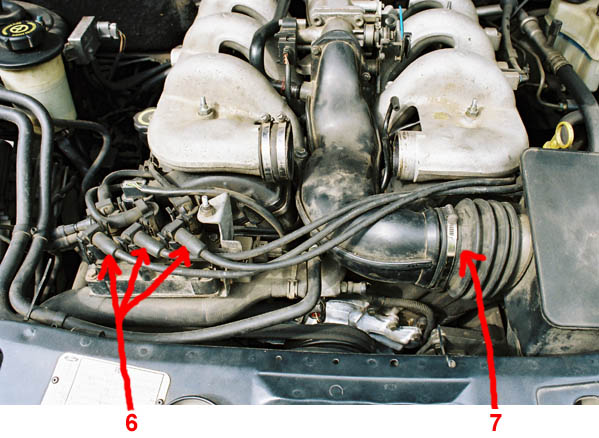
5. Remove the front HT spark plug leads (6) from the
distributor. The cables are of different lengths, so the risk of them
getting accidentally mixed up when you put them back is very low. However,
tagging them would be a good idea if you want to play safe.
6. Slacken the collar (7) between the resonator and the
central part of the inlet, then detach the inlet from the resonator.
|
 |
|
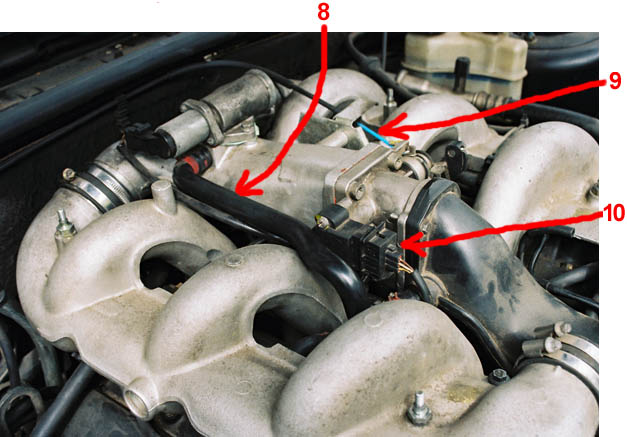
7. Disconnect the TPS plug (10).
|
 |
|
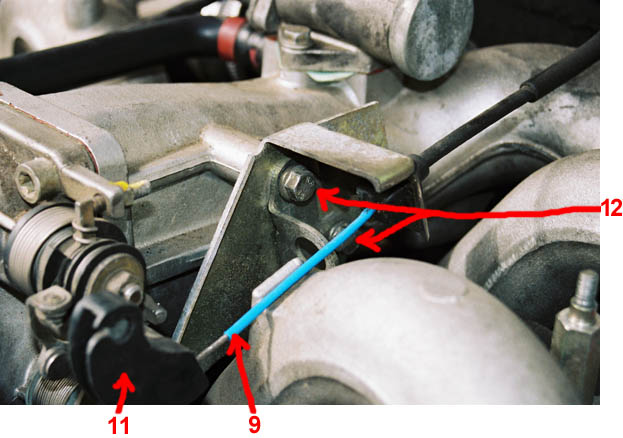
8. Remove the accelerator cable (9) from the quadrant
(11). This step isn’t absolutely necessary, but it helps if the cable is a
little slack when you get to the next step.
9.
Remove the two bolts (12) located under the accelerator cable, behind the
quadrant.
|
 |
|
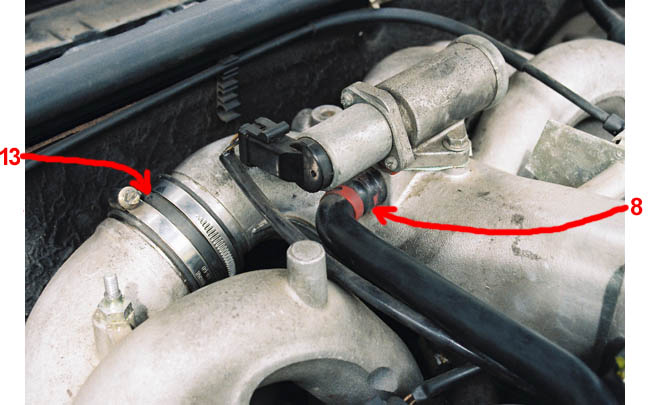
10. Slacken the two collars (13) located on the left
side of the inlet manifold, in the back, above the EGR valve.
11. Slightly raise the front of the central part of the
inlet, pivoting it around the points where it is connected to the two sides
of the “octopus”, in the back. Do not pull it too hard, it
will only go up a few inches, but that’s all you really need.
Now the fuel rail is visible. It has two sides, one for
each bank.
|
 |
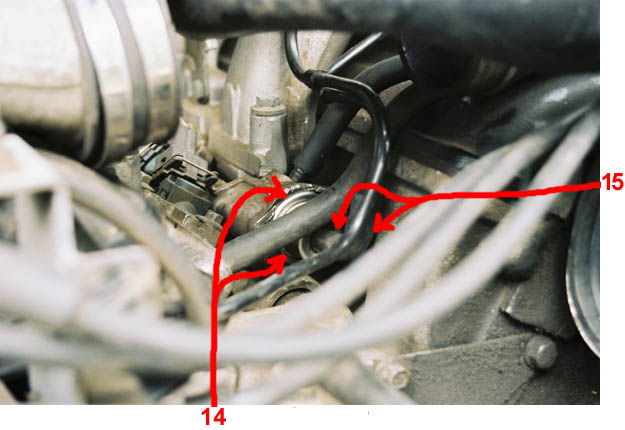
| At the front end of the right side (as seen from the front)
of the rail you’ll see a vacuum hose (15) connected to a cylindrical valve
(14). This is the fuel pressure regulator. This picture shows a side view of
the pressure regulator after I removed the vacuum hose: |
 |
|
… and a view from the front, also with the vacuum hose removed: |
 |
|
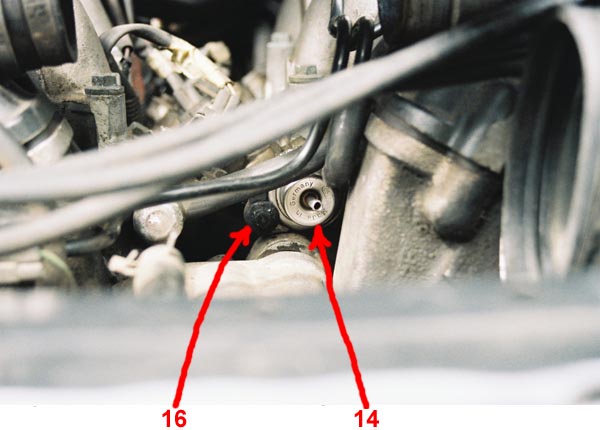
The pressure regulator is attached to the rail by means
of two 7 mm bolts (16), one of which is not visible in this picture,
and it’s sealed by two rubber O-rings (17).
12. Remove the two bolts (16).
|
 |
| 13. Now it’s time for the most difficult part of the job:
removing the pressure regulator from the rail. It must be pulled towards the
front. The problem is that it’s a very tight fit and the regulator won’t
come out too easily. You won’t be able to simply take it out by grasping it
with your fingers. I used a pair of pliers, a lot of force, a lot of sweat
and a lot of swearing. At first I even thought that there must be another
bolt or something, because I couldn’t move it at all, not even half a
millimeter, but actually there’s nothing else to hold it except the pressure
of the O-rings on the fuel rail inner walls. If you keep pulling as hard as
you can while shaking the pliers in all directions, it will eventually come
out.
|
|
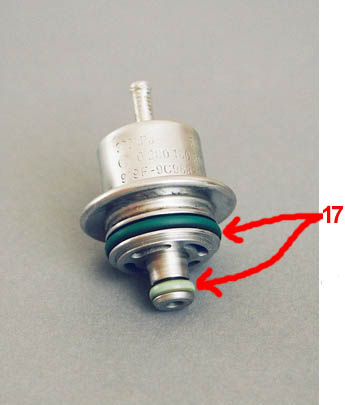
This is the pressure regulator.
Pressurised fuel enters the regulator through the long,
narrow holes visible below the big O-ring. There is a spring valve inside.
If the fuel pressure is higher than a preset value, it forces the valve
open, sending excess fuel back to the fuel tank through the small hole in
the tip (below the small O-ring). This way the regulator manages to keep the
pressure in the fuel rail constant.
Vacuum comes into play when the engine is overdriven
(when decelerating without braking), forcing the valve to open even further
than usual.
|
 |
|
2. Installing the
fuel pressure regulator
Before mounting the new pressure regulator, lubricate
both its O-rings (17) with engine oil (remove the dipstick, take a little
oil on your finger and spread it on the O-rings). This will not only make
the pressure regulator get in easier (remember how hard you had to pull to
get it out?), but will also minimize the chance of the O-rings getting
damaged when you push the regulator into the rail.
1. Insert the pressure regulator into the fuel rail,
then push it as hard as you can until it clicks in place, but this time
without shaking, because shaking could damage the O-rings.
2. Screw back the two bolts (16).
3. Turn on the ignition (do not actuate
the starter!). Look carefully around the pressure regulator to see if there
is any fuel leak. If there’s no leak, turn off the ignition and go to step
4.
4. Connect the pressure regulator vacuum hose (15).
5. Lower the central part of the inlet and connect it
to the resonator (collar 7)
6. Install everything in reverse order: bolts (12),
accelerator cable (9) on the quadrant (11), TPS plug (10), high-voltage
cables (6).
7. Tighten the collars (7) and (13).
8. Install the VIS valve (5) and tighten its collars
(3) and (4).
9. Connect the VIS actuator vacuum hose (1)
10. Start the engine. If the engine runs fine, go to
step 11.
11. Put the engine cover back on.
|
After the fuel pressure regulator was changed, Vlad reported that the engine
now started first turn, whatever the temperature,. He watched the fuel trims
slowly readjust toward zero, and noticed that the car was smoother and much more
powerful. As suspected, the faulty regulator had pushed fuel pressures
much too high and this had resulted in flooding the engine in all conditions
apart from full-throttle. The Fuel Trims had tried to compensate for the
overfuelling but the overpressured fuel rail was beyond the operating
parameters.
Many thanks to Vlad for his text and pictures, with
congrats for his excellent English.
|
|
