Last update:

08/03/2005

  Fitting a towbar

About Us Useful Links Forums Mailing List


PLEASE SUPPORT US
Newbie Guide
FAQ
Search / Map
About the Car
Fault Finder
Air Conditioning
Servicing/Repairs
Experiences
Buy and Sell Scorpios
Breaking & Spares
Parts Dealers
DISCLAIMER

 
The Scorpio is a great tow car - especially the Estate fitted with the self leveling suspension (optional on the Saloon but rarely fitted). I wanted to get a tow bar fitted to mine for towing a boat trailer and phoning around indicated prices of between £140 and £150 plus VAT. Not expensive but where's the fun in having someone else do it for you?

A quick telephone call located a Witter tow bar and single electrics in stock for £96 incl VAT. Hang on a sec - a part for a Ford Scorpio actually IN STOCK - there must be a catch! In fact the Witter tow bar for the Ford Scorpio is exactly the same as the one for the Ford Granada - not surprising really as they share the same floorpan. The model number is F56. The same model fits both the Saloon and the Estate.
 

I opened the box and located all of the parts - it surprised me just how heavy a tow bar is so you need to be careful as dropping part of it on your hand will cause some damage!

Step 1 was to make sure that it all fitted together and that I understood where all the parts went - not so straightforward as the instructions were very confusing (translated from a foreign language perhaps?). The kit comes with a longitudinal drawbar that fits behind the bumper and a lengthwise front/rear bar that fits to a front bracket that bolts to the body using the differential bracket fixing bolts. Two front brackets are supplied with the manual saying one was for a 'transaxle' the other wasn't. After a bit of fitting I realised that the Scorpio didn't have a 'transaxle' so consigned that one to the bin - actually only one physically fitted so that was easy enough.

Likewise the instructions referred to removing a lower trim plate and cutting a 140mm hole - this can be ignored as it refers to the Granada installation. In fact the finished result is a very neat installation. The bar clears the bottom of the bumper by 2-3 mm and the tow ball does not affect the number plate - very neat.


I test fitted everything up before I started in earnest and it all seemed to line up ok so I started to remove the rear bumper.
Firstly jack the rear of the car up and place it on stout Axle Stands - never work underneath a jack please.
Behind the side pieces of the bumper you will find a large clip (called a butterfly clip) that has to be gripped by hand and rotated 90 degrees - this releases the sides of the bumper but you then need to grasp it from outside and pull it away from the body - it's held in a clipped channel and a hearty pull is needed to release it.
Next crawl under the car and locate the two fixing bolts at each side - they are probably covered in underseal etc and Ford in their wisdom decided to use 8mm TORX head bolts (T35). After 6 years these will never come out - I snapped 2 TORX bits in the process and ended up having to drill them all out - this is a real pain as you have to then remove the studs. I took the metal brackets off the bumper after removal and heated the studs up, cutting a slot into them with a hacksaw and used a larger screwdriver to remove them - this was the most difficult task of the lot.
Once the bolts are removed the whole of the bumper can be removed but you need to release the number plate lamps. These simply clip in so slide a thin screwdriver down the side with the clip and pop them out - then turn the bulb holder 90 degrees to release them. Put the bumper somewhere safe where it won't get damaged.

At this point I discovered quite a bit of rust in the rear section of the bodywork and so sprayed liberal doses of Waxoyl and Cavity Wax everywhere to prevent further damage.

I fitted the rear drawbar in place temporarily with the large tow ball bolts through the original bumper holes - this allowed me to locate everything before I reinstalled the bumper. The front bracket is installed using the front bolts of the differential bracket - the bolts are plenty long enough for this. Then the front/rear bar is bolted to the front bracket and aligned with the rear drawbar which has additional plate  that bolts to a hole that Ford must have created for this very purpose - how kind of them. Once these pieces are loosely bolted together you have to take a piece of supplied angle iron and thread it into the box section - Witter give you the measurements for two 10mm holes to be drilled but instead I placed the angle iron underneath the box section and aligned the single hole on one of it's sides with the Ford provided one and marked the positions for the two remaining holes underneath, drilling them with a 10mm drill and finishing off with some paint and underseal. Then I threaded the angle iron back into the box section and bolted it up.

Witter give very confusing instructions about a spacer which caused me some problems as they didn't show exactly where it should fit. The answer is that it fits against the vertical edge of the angle iron behind the side of the box section and not in front of it as their diagram shows.

All that remained was to tighten everything up - I used 35Nm with a Torque Wrench for all bolts.

Then to refit the bumper - I removed the temporary bolts holding the rear drawbar which was by now firmly secured to the car and pushed the rear bumper back into position. There are 4 M8 bolts supplied in the kit that replace those TORX bolts that were destroyed earlier and these are fitted with the original large flat washers and bolt the drawbar to the bumper through the bodywork. With everything nice and secure all I had to do was refit the side pieces and replace the butterfly clips.
 

Wiring

I am only using the Scorpio for towing a trailer and so a single plug was adequate whereas a Caravan will require a double unit. After removing everything from the boot I found a convenient rubber grommet already in place on the right hand side which fed cables into the light cluster. All that was needed was a pack of Scotchlocks (supplied) and a multi meter to test which cable was which (looking at the power connector the top wire is sidelight, next is indicator, next is stop lights, reversing light (not used) and earth. The kit I used came with an audible alert for when a trailer is connected but I will investigate advice that there is a dashboard lamp available.

I connected up all of the wires as per the instructions and fed the cable through to the socket which was simply wired up and then bolted in place, having received a healthy dose of wax to prevent corrosion problems later.

If using the same method as I did for connections then the loom for the left hand light cluster is also available at the same point - this is needed for the separate connections needed for the left hand indicator and left hand sidelight. Don't use the light cluster earth for earthing your connections. I remove one of the fixing nuts for the cluster and cleaned around it to bare metal. I then fitted earth rings to the wires and bolted them under the fixing nut, spraying some wax around it afterwards.

The only problem that I found was that I needed a long length of cable to connect to the Foglights - someone put them in the bootlid!

Finally I bolted up the tow ball very very tight and plugged in the trailerboard to test the whole lot. And it all worked!

All that remained was to get the black hammerite out and spray the whole lot liberally with Waxoyl to keep the rust at bay.

Now although I enjoy messing around with cars I have to say that the £50 odd that I saved was not really worth the efforts that it took to do this. I would recommend that you get the tow bar fitted by a professional as the bumper bolts will not come out and will probably have to be drilled etc. But, I enjoyed doing it and found some rust that I managed to prevent spreading.
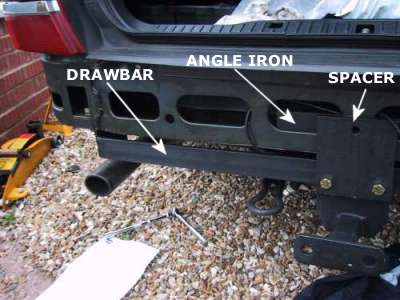
Here you can see the rear bumper removed showing the box section into which the angle iron piece is threaded. Place the small spacer next to the angle iron, then the box section and then that large plate that connects to the drawbar.
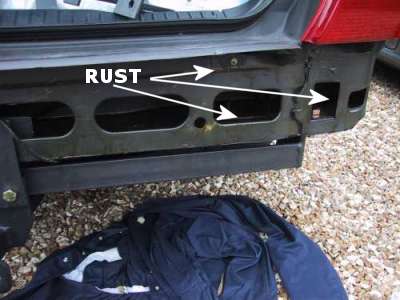
 
When I removed the bumper I found quite a bit of surface rust. The car is a 1995 and I was surprised to not find more. Anyway a liberal does of cavity wax was sprayed into the box sections and inaccessible places to prevent further rust forming.
 
I laid all of the parts out under the car to measure and see if it all fitted. Actually the tow bar was of very high quality and everything fitted first time and without needing modification.
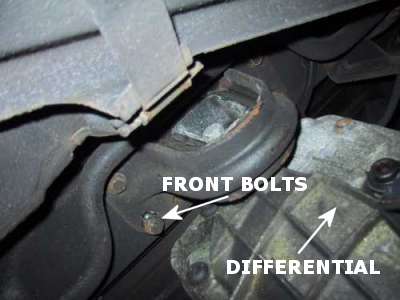
 
Here you can see the bracket thar locates the differential - the instructions are a little confusing but choose the options for a car not fitted with a transaxle and use the front bolts.
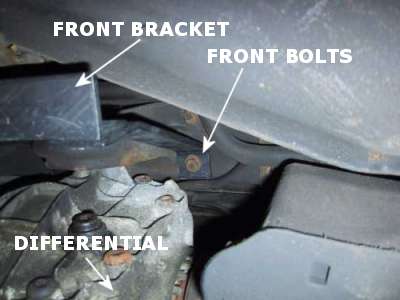
 
This picture shows the front bracket bolted in place to the differential bracket. The front/rear bar is then bolted to this, running back to the drawbar.
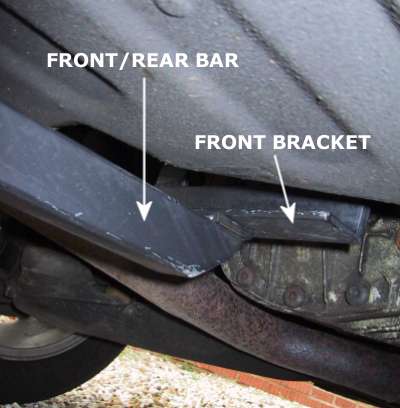
 
Now all bolted up and just needing a coat of paint and wax to keep the rust at bay.
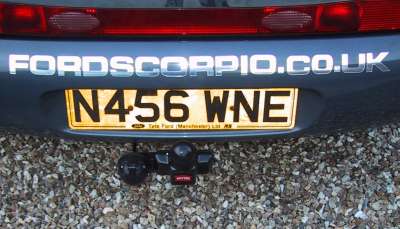
 
Finally installed with it's black protective cap - it's a neat piece of kit and I have no hesitation in recommending the Witter tow bars


Copyright © 2001 www.fordscorpio.co.uk