Having left the car
standing for 3 weeks whilst on holiday, I returned to find that not only were
the front disks very rusty but that I was getting quite significant amounts of
vibration under braking. It may be that I had got used to it and only noticed it
when I got back into the car but anyway I decided to replace them.I sourced a
set of brake pads and disks from Halfords - Ferodo pads which came with sensor
wires - which are not used on my Scorpio 24V and so were cut off and Halfords
own disks. However these were shown as 260mm diameter and when measured against
the old ones were obviously too small - so a return to the Store and they
ordered in a set of optional 278mm ones made by Brembo - fortunately they let me
off with the price difference.
The task of changing disks is very simple and you will require the following
tools
15mm Ring Spanner
7mm Allen Key
Pliers
Small file for cleaning
String
Copperslip grease
Degreaser (I use Carb Cleaner) and clean rags
Step 1
Remove the wheel cover and slacken the road wheel nuts by half a turn.
Jack up the car and place an axle stand under the crossmember. Please don't work
on the car supported by just a jack - one day it will fall and crush you or
damage the front of the car.
Remove the road wheel (take the opportunity to clean the inside with hot soapy
water)
Step 2
Using a pair of pliers, remove the spring clip from the caliper - pulling the
lower part out first. At the rear of the caliper, locate the two rubber 'knobs'
and remove the plastic caps. Inside you will find a bolt that requires a 7mm hex
(Allen) key - you may need a piece of tube to act as an extension as they can be
quite tight. Remove these two bolts.
Step 3
The main body of the caliper will now pull off the disk - use a slight side to
side motion to compress the cylinder back to give it some clearance. The brake
pads can be removed and discarded (don't reuse them even if they are only part
worn). One is clipped into the cylinder and simply pulls out and the other just
sits against the other side of the caliper and may just fall out or need a bit
of prising.
Carefully clean the caliper - note where the pads sit against the caliper and
clean these areas with the small file to remove deposits and then lightly smear
copperslip grease on the clean faces. Using a suitable piece of wood push the
cylinder back into the caliper - check your brake fluid reservoir under the
bonnet to make sure there is no overflow. Use a piece of string to tie the
caliper out of the way so that there is no tension on it's connecting pipe.
Step 4
Using a 15mm ring spanner or socket remove the two bolts that hold the caliper
retainer to the hub. These are very tight which is another reason to have the
car on axle stands and not on jack. Remove the
caliper retainer and clean with a wire brush and file as you did the caliper.
Use copperslip on the wearing surfaces.
Step 5
The disk can now be removed simply by tapping it's rear face with a mallet.
Discard it.
Step 6
Smear a small quantity of copperslip on the mating face of the hub before you
place the new disk on there - this will make future removal much easier.
Degrease the new disk faces thoroughly as they are coated with a protective oil
- you only need worry about the parts that are touched by the pads. Place the
disk onto the hub and relocate the caliper retainer using the 15mm bolts. Make
sure that they are tightened fully (35 Lb ft)
Step 7
Put new pads into the Caliper and fit the Caliper back into the caliper
retainer. Refit the hex bolts and tighten and then replace the plastic caps.
Insert the top of the spring into the upper hole first and then using pliers put
the lower part back in place. Check the disk for any oil or copperslip
contamination and refit the road wheel. Make sure that the nuts are tightened as
much as possible before lowering the vehicle to the ground and then tighten them
a little more - remember with alloy wheels that the nuts should not be overtight
- I normally use the supplied wheel brace and use my bodyweight to add 1/4 turn
after I have tightened them by hand.
Typical costs are approx £60 for disks and £30 for
pads although I noticed that Motor Factors such as Partco can now do them for
around £20 a pair!.
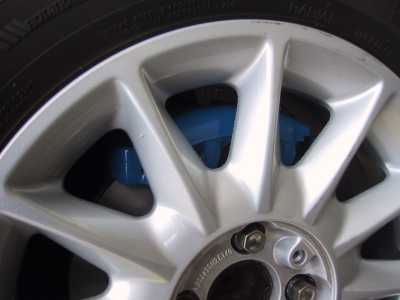
In addition I decided to paint my calipers using a two part high temperature
paint again from Halfords. It looks very effective but does take 2 days to fully
harden so make sure you don't need the car for that period.