Changing the Fan (Ancillary Drive) Belt
Mechanical fans are not used in the Scorpio, and instead additional engine
cooling is provided by electric fans mounted on the rear of the radiator. Drive
belts are still required though - for the alternator, water and power steering
pump and the AC compressor where fitted.
For many years Ford used one bolt on the alternator as a fulcrum so that the
alternator could be moved outward to tighten the drive belt and clamped with a
bolt. This had the disadvantage that a new belt could become loose after only a
few miles as it wore in and the alternator needed constant adjustment.
The more modern fitment on the Scorpio is by clamping the alternator to a rigid
mount, and keeping the drive belt taut by means of a tensioner (or two). This
has many advantages - as a new drive belt stretches the tensioner takes up the
slack automatically. The belt cannot be overtightened to cause premature wear on
the alternator or water pump bearings and the shaft bearings of all the
ancillary units are kept at a constant design load. Because the belt cannot
loosen, wear is much reduced - a slipping belt wears 100 times faster than a
gripped one.
The tensioner used by Ford consists of a large clock spring wrapped around one
bolt, engaging in an arm on which a pulley is mounted. Because the action of the
spring is anticlockwise, when engaged the pulley pulls the drive belt at a
pressure set by the spring. As the drive belt lengthens with wear, so the spring
takes up the slack. Because of the constant tension drive belts last for years,
but they should be checked regularly for signs of wear. The belt might become
cracked across its width, normally in the grooved face, or it may become glazed
or frayed in appearance.
There are two petrol installations - one for the DOHC engines which have slight
variations on one drive belt, and the other for the V6 engines, both 12V and
24V. The VM diesel has its own unique tensioner.
NOTE: If the drivebelt tensioner(s) are in good order then they will
swivel about the fulcrum bolt quite easily using only medium force.
However, if the tensioners have corroded in place (after
karchering the engine
bay, for example) then considerable force may be required to release the
tensioner - in this case additional leverage may be required and care used to
avoid injury.
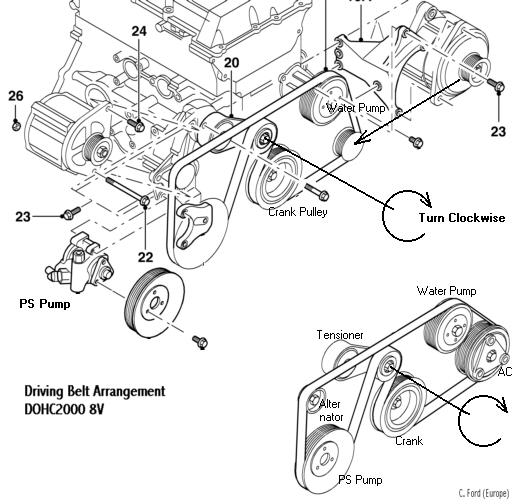
DOHC 8V
The DOHC engine has one drive belt.
In 8V models without air conditioning, the alternator is mounted on the RH side of the block. Where A/C is installed the pump takes its place and
the alternator uses a LH mounting, replacing an idler pulley.
the RH side of the block. Where A/C is installed the pump takes its place and
the alternator uses a LH mounting, replacing an idler pulley.
In both cases the tensioner is as shown. The tensioner pulley is engaged with a
17mm spanner or socket and turned (if necessary with an extension bar)
clockwise. This winds the tensioner further against its spring and provides
enough slack to pull off the drive belt from one of the pulleys - for
convenience the alternator pulley is best. The tensioner can then be gently
released and the drive belt removed from all the pulleys. The new belt is fed
round the pulleys except the last, the tensioner then turned clockwise again,
and the alternator pulley refitted with the drive belt. When the tensioner is
released it will pull the drive belt to its predetermined load. A careful check
to make sure that the belt is properly aligned with all of the pulleys, and the
job is done. 10 minutes, max.
The figures right show the DOHC8V without AC and, lower, with the compressor.
Finis Numbers:
| 8V with A/C |
1 068 252 |
| 8V Less A/C |
731 608 |
DOHC16V
The 16V arrangement is very similar and the drive belt is removed in exactly
the same way. In the case of the 2300 there may be an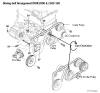 idler pulley between the crank and the compressor.
Without an AC pump, the 16V may have an idler pulley mounted instead.
The tensioner and the process is the same.
Finis Numbers:
| 2.0 16V with A/C |
1 068 252 |
|
| 2.0 16V Less A/C |
731 608 |
|
| 2.3 16V Man With A/C |
1 033 499 |
|
| 2.3 16V Man Less A/C |
1 033 500 |
|
| 2.3 16V Auto with A/C |
1 068 252 |
|
| |
|
|
V6 Scorpios 12V & 24V
In the case of the V6 Scorpio there are two drive belts. From the front of the
engine, the AC drive belt is first and has its own tensioner. The picture right
shows this and the tensioner is released in the same way. Once the AC belt is removed, the left hand tensioner
is released and the longer drive belt removed.
released in the same way. Once the AC belt is removed, the left hand tensioner
is released and the longer drive belt removed.
I found that there is enough room to work from the top of the engine with a
short 17mm socket and an extension bar. This provides enough leverage to release
the tensioner without struggling. The tensioner tends to 'lock' in its position
and some effort may be required to make the initial movement.
To prevent damage to the tensioner arm or spring, release the spring pressure
slowly, especially when removing the belt.
Drive belts may be obtainable more cheaply elsewhere than Ford, but IMO quality
might not be the same. I had both belts on my 24V replaced in 1998 and I now see
that they are slightly glazed and might need changing next year - after 60,000
miles!
Finis Numbers:
| 12V Cooling Belt |
6 606 514 |
£13.57 approx |
| 12V A/C Belt |
7 082 866 |
£8.35 approx |
| 24V Cooling Belt |
7 310 607 |
|
| 24V A/C Belt |
7 082 866 |
|
2.5 VM TDI Diesel
The diesel arrangement has changed from that used in the Granada, where the
tensioner was next to the water pump. On the Scorpio the tensioner plate has
been moved lower, next to the crank pulley. Otherwise the procedure is the same.
The tensioner pulley is mounted on a free fulcrum, attached to a tensioner on
its lower edge. This tensioner is then bolted to a plate beneath it which is
held in position by a clamp bolt.
The procedure for removing the driving belt is simply slackening the clamp bolt
shown on the diagram. A 1/2" square drive is placed in the square hole provided
beneath it and the plate is turned fully anticlockwise. This releases the
tensioner and provides enough slack to pull the drive belt away.
With the new belt fitted, the half inch drive is again utilised to turn the
mounting plate clockwise until the tensioner itself measures 82mm between the
bolt centres, then the clamp bolt is tightened to a torque of 65Nm. This
measurement insures that the device is at the correct tension.
The vehicle should then be run for 3 miles or engine run for ten minutes, then
the tensioner length should be checked again.
Finis Numbers:
| VM2.5 with A/C |
1 690 049 |
| VM2.5 less A/C |
1 633 063 |