A/C Booster Modification for Cooler Vent Temperatures
This is the culmination of about two years investigation into
the cooling ability and vent temperatures of the Scorpio. All Ford Scorpios I
have tested have been well within ford spec but this still means that if you
want really good cooling in the summer and you have the climate control set on
"Auto" with a fairly low temperature selected, then the interior blower will be
on high for most of the time trying to achieve the correct interior temperature
and on a long journey this can become very tiring and in hot summers good
cooling of the interior is not achieved.

Standard A/C centre vent temperatures for the Scorpio in degrees
Centigrade.
(A is vent temperature spec and B is the external ambient
temperature)
In my investigations I found that the centre vent temps were
achieving similar values whether the exterior ambient was 10c or 30c which was
interesting in itself. In a poorly performing system the higher the exterior
ambient the higher the vent temps would be. I had the system recharged to the
new level of 1k of R134a and I hoped that this would improve things
dramatically, in reality it made no difference to vent temps at all although the
capacity to “remove” heat would have been improved, but lower vent temps was
ultimately what I was after.
I then began to suspect that it was simply the inefficiency of the refrigerant
gas R134a as opposed to the older more efficient R12. In one of my other cars
still running on R12 I was getting vent temps of about 2c, icy cold air
virtually instantly. I spoke to a lot of A/C pros. in the UK in trying to
improve vent temps but got virtually nowhere.
My quest continued and I joined some of the U.S. auto A/C news groups and took
advise where I could, a lot of the pros basically said that the system is
inherently inefficient and not up to the job and suggested that I would always
get poor cooling with the Scorpios system. I wasn’t convinced!
I next suspected that warm air could be leaking from the blend door under the
dash or maybe even a door not closing properly, I did tests and if you listen
very carefully you can actually hear a slight thud as the door closes tightly
when you turn the temp setting on the Climate Control from Hi to Lo, I tried to
get into the blend unit but it is a full dash out job and steering wheel removal
which I didn’t really fancy.
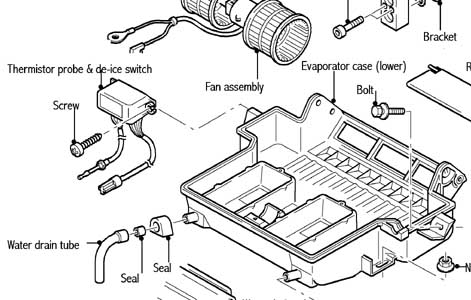
I then started to monitor evaporator temperatures by inserting a probe between
the pollen filters and the delicate evap fins.

Pollen filters in front of Evaporator fins with lid removed
These were indeed cycling to just above freezing which was
within Ford spec. This meant that the air was picking up about 4 degrees
centigrade worth of heat between the evaporator and the centre vents which is an
awful lot. The reason for this is that the air has to travel such a long way to
the centre vents. From the evaporator the air comes into the cabin and travels
virtually down to floor level where it enters the blend and distribution unit,
even with the blend doors shut it is also bound to pick up some heat from the
closed doors to the heater matrix, it then has to return up to the centre vents
height. The dash being black can absorb large amounts of heat and this will be
taken in through the black air ducting. My next thought was to consider
insulating the ducting although this would result in only marginal improvement
so I did not go down this time consuming and fiddly route.
So there was something that was stopping the centre vents getting below a
certain value and I wondered if this could be the de- ice probe and switch
mounted in the evaporator or whether another protection circuit would come into
operation if this was disabled.
So I disconnected this switch and indeed another protection circuit does come
into play and vent temps were no better. So I next reconnected the sensor and
managed to remove the probe from the evaporator completely and “Eureka” the
centre vent temps fell from about 4c to -2c within a couple of minutes, I had
finally cracked it.
But the thermistor and de-ice switch cannot be taken out of the system as they
are there for a purpose which is to prevent the evaporator freezing up, but Ford
have erred on the side of caution, which is understandable, and led to the
increased amounts of R134a being added to try and improve performance after
customer complaints hence the TSB to this effect. With the thermistor removed
from the evaporator I did tests to see when the evap would freeze and of course
if that does happen then you get no air to the centre vents. I was getting vent
temps of -10c before airflow stopped! This is obviously dependant on ambient
relative humidity as well of course.
As you may know the Scorpios system uses a thermal expansion valve and is a
cycling system.
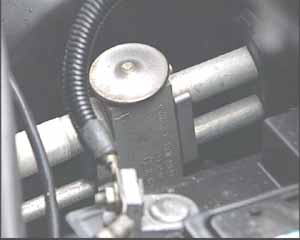
Thermal Expansion Valve
Instead of allowing the evap to cycle to below freezing and then
rise above it in the cycling nature, the de-ice switch cycles the compressor off
just before it drops below freezing at about 2c according to Ford’s literature
and this is what stops low interior vent temperatures being achieved. If the
evaporator is allowed to drop below freezing and then cycle off at say -2c, then
even if light icing occurred on the fins this would thaw in the compressor “off”
part of the cycle and the vent temperatures would be improved dramatically.
In some older U.S. autos they had a "desert" A/C setting for geographical
locations where the rh% (relative humidity) was very low where evap freezing
would not be a problem and vent temps of -6 were not uncommon. In our more humid
UK summers, with SW prevailing winds, rh levels of 80% are not uncommon in
summer heat making evap icing more of a concern.
One of the solutions was to move the thermistor probe further away from the evap
so that it was registering higher values and therefore not cycling the
compressor off until later and this experiment did in fact work, the problem
with this is that the position of the probe is critical as it has to be just at
the edge of the evap core so that it senses the evap. If it is moved just a
couple of mm further out it is in the evap air flow but doesn’t get anywhere
near cool enough and I was getting vent temperatures of -8c which is far too low
and of course this is not a good policy in winter when drying of the interior
air is required but extreme cooling is not.
So the real answer was to have the thermistor probe in its correct position in
the evap core but to have this item adjustable from the cabin, so in discussions
with an A/C pro in the states and with Steve Collister with his electronic
knowledge we devised a very simple device which is attached to the wiring in
between the thermistor probe and the de-ice switch, this can effectively be
taken out of circuit by switching the variable potentiometer to 0 putting the
whole system back to Ford spec for winter driving and then increased for
superior cooling by altering the pot to one of the lower settings for extreme
summer heat. This is basically fooling the thermistor telling the system that
the evap is warmer than it actually is, I’m sure you get the picture.
 Dave N
A/C modification potentiometer
So..........basically the Scorpios extremely powerful A/C
Climate Control system is spoiled and turned into a poorly performing system by
Ford’s conservative de-ice thermistor, in later tests the system has proved to
have an incredible cooling capacity, better than the majority of other modern
cars.
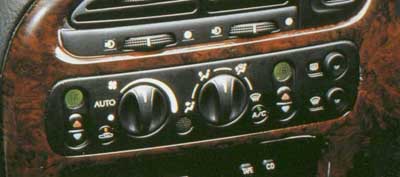
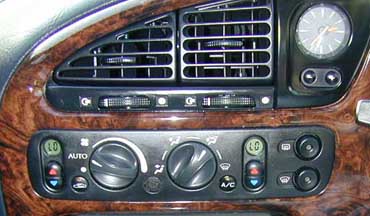
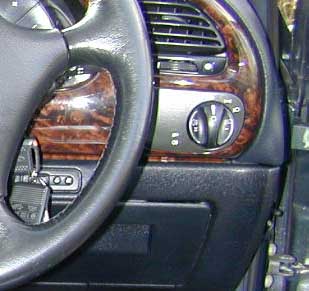
Scorpios Climate Control Panel
So is it safe? well the worse thing that can happen if you were
to run things way too cold, which we don’t intend to and which the current mod
is not capable of, is that the evap fins would freeze and air flow would reduce,
and if that happens you would simply turn off the A/C and the ice would thaw and
drain away. Don’t confuse this with frozen pipes etc, it is the external
evaporator fins condensation that is freezing and not anything internal. Having
asked this crucial safety question to over twelve A/C pros, every one of them
says that even if everything freezes solid there is no problem with damage.
However even saying that we do not intend to run anywhere near those levels
which anyway results in blocked airflow which results in no cooling in the cab
which defeats the object of the modification.
And the results… well on hot days when the Scorpio has been parked up it is not
uncommon to have an interior temperature exceeding 40c and I have found that by
turning the A/C mod booster to position 11, rapid cooling and low fan speed is
achieved within about 5 to 10 minutes with the cc setting on “Lo” and the system
on “auto”. I have not found it at all necessary to leave the system on the
maximum setting after this and I reduce the cooling power by backing off the A/C
mod pot and after initial cooling simply returning it to Ford spec. Obviously in
a baking hot summer then a higher standard setting may be required.
The modification has 12 settings, these being "0" system off i.e. normal Ford
spec, to "11" maximum cooling.
The modification consists of 11 Resistors, these having values
of 75k, 90k, 110k, 130k, 160k, 180k, 200k, 220k, 240k, 270k, 300k with position
one having no resistor for normal Ford spec. It was decided to use this method
rather than a simple a rotary variable potentiometer to achieve set value easily
selectable whilst driving.
Steve Collister is happy to make up the units for you for a
small charge or if you have the electrical ability you can make them up
yourself. Just post on the Scorpio Confidential Mailing list if you want further
advice or help.
Once you have the unit made up here’s what you need to do:
STEP 1: Remove the windscreen wiper arms.
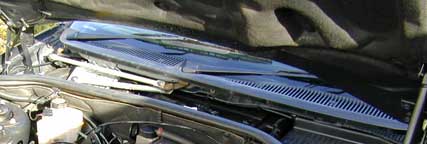
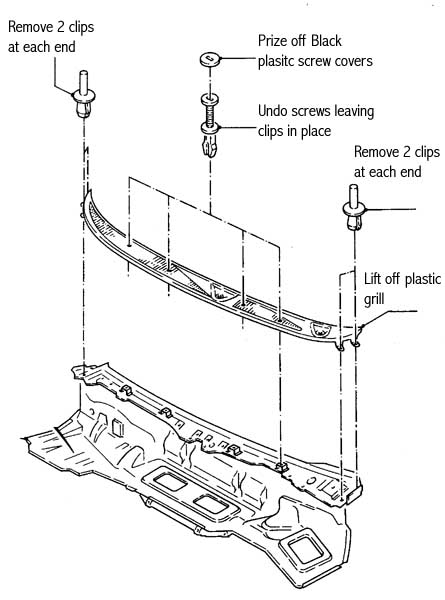
STEP 2: On the black plastic grill just below the windscreen carefully prize off
the 4 plastic screw covers and unscrew the 4 screws. Then remove the 4 black
plastic clips that look like rivets at each end of the plastic grill. Then lift
up the grille and remove
 Dave
N
Dave
N
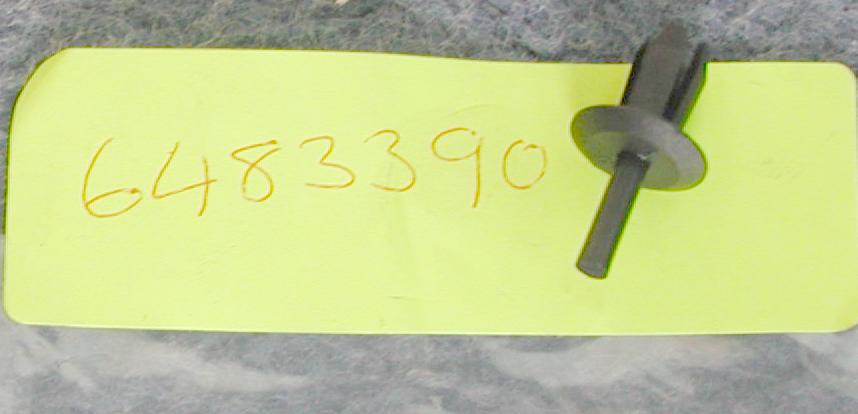
These rivets invariably break. Order new ones - Finis and
rivet shown below.
STEP 3: Next you need to remove the Windscreen wiper assembly, undo the 4 x 8mm
bolts holding the windscreen wiper assembly in place and disconnect the
electrical multiplug underneath and lift the unit out.
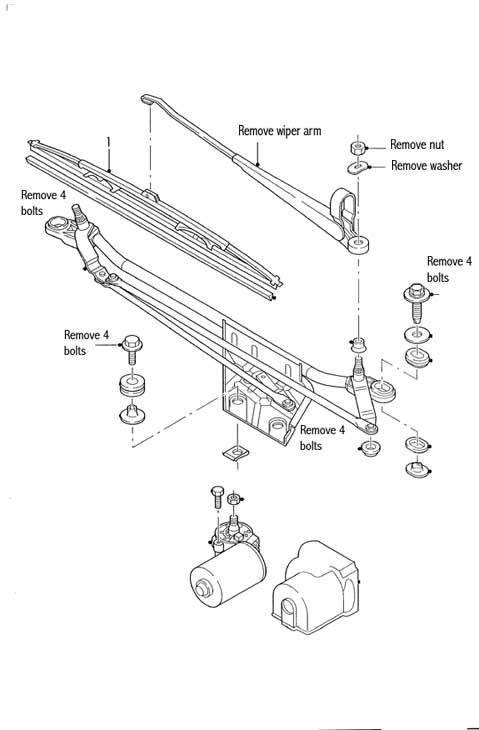
Note that the motor assembly will come out in one unit still connected to the
wiper linkage.
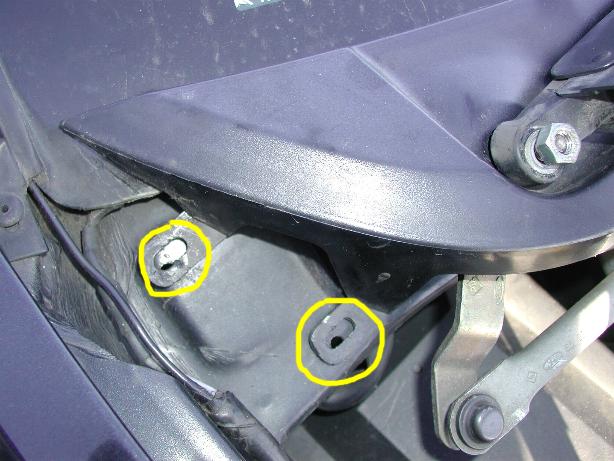
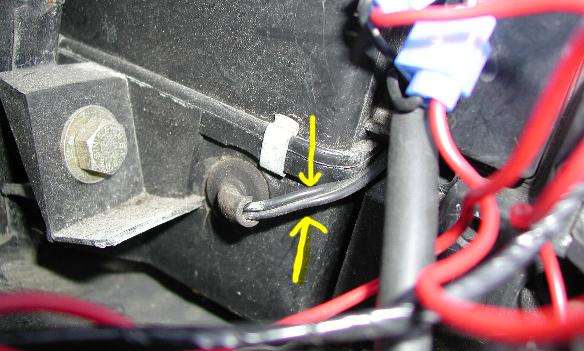
You will then be able to see the de-ice switch and thermistor probe disappearing
into the side of the evaporator and it is this two wire cable that you need to
cut into, more of that later.
 Dave
N
Dave
N
To the left of the de-ice unit you will see a rubber grommet that feeds some of
the A/C and other cables through to the cabin. Gently pull out this grommet.
Next go into the cabin and remove the lower part of the black facia that
surround the change cubby, by undoing two screws on the right by the drivers
door, two screws near the computer trip panel and one screw on the far left down
near the footwell. Undo the socket to the trip computer panel and prize out the
FDS connection port allowing better access to the under dash. The car hood
release mechanism is still in place and need not be touched.
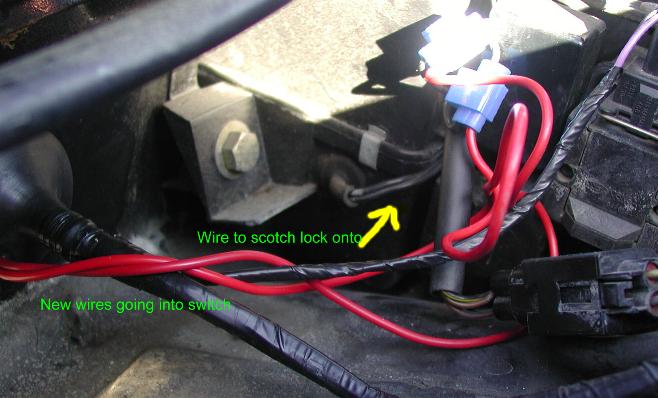
Then go back outside to under the hood and feed though a stiff length of wire
through the hole with the grommet removed, then go back into the cabin and tape
the length of wire connected to your new A/C Mod and then pull this through to
the area near the de-ice switch, un-tape the wire from the stiff wire. Feed the
wire though the rubber grommet and refit, WD40 on the grommet sometimes helps in
replacing the item easily.
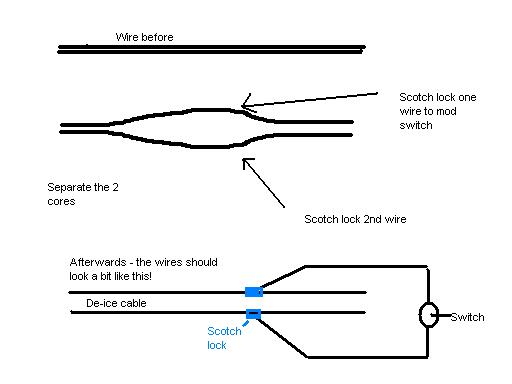
Next, separate the two wires between the de-ice unit and where the thermistor
wire disappears into the evaporator, do this at a convenient point near to the
switch unit itself. Then scotch lock one wire to one wire of your ac mod and the
second wire to the second wire of your ac mod. Make sure the connection is good
and tight and then insulate with insulation or self amalgamating tape
 Dave
N
Dave
N
The switch is wired in parallel, ie in line with the thermister,
one wire to each.
 Dave
N
Dave
N
Now the interior unit can be located in several places and that
is ultimately up to the individual owner. One location is within the change
cubby but I have made a different approach to make the car look unmodified.
If you have self levelling suspension you will not have a headlight levelling
device and knob fitted next to the headlight knob and this will be a single knob
bezel.
Original Single Headlight Bezel
However it is exactly the same fit as the dual bezel so here’s
what I did.
Order up the new dual bezel and headlight levelling knob, make sure it’s for RHD
and with the appropriate amount of fog lights that your model has, e.g. the
Ultima has front and rear fog lights, incidentally the bezel comes with all the
internal lights and the two LED's for front and rear fog lights.
In your existing unit remove the headlight knob by inserting a small screwdriver
into the bottom side of the knob where there is a small release catch.
Gently prize out the existing bezel from one end with a screwdriver putting a
pad in between so as not to mark the plastic wood effect facia.
Feed the A/C mod pot under the dash and into the back of where the headlight
leveller would be, there are already the appropriate holes made in the dash and
the bezel. The hole in the dash is too big to support just the nut that goes
around the ac mod pot so insert a large industrial washer or such over this on
the front side of the plastic dash and then screw the nut onto the unit securing
the pot behind the dash moulding but with the spindle protruding. A note here
when you are ordering your unit from Steve Collister tell him whether you need
the unit for this installation or made for the change cubby as the spindle on
the pot will need to vary in length for the appropriate location. You may find
that you need to adjust the exact position of the pot now clamped to the dash to
get it perfectly centre with the bezel but this is not a difficult job to
achieve. Then simply connect the new bezel up to the electrics, fortunately the
plug and socket are identical to the single unit item and all circuitry and
functions are identical, pop the bezel back into the facia, pop on the headlight
knob and then connect the new ford levelling knob to the A/C mod spindle.

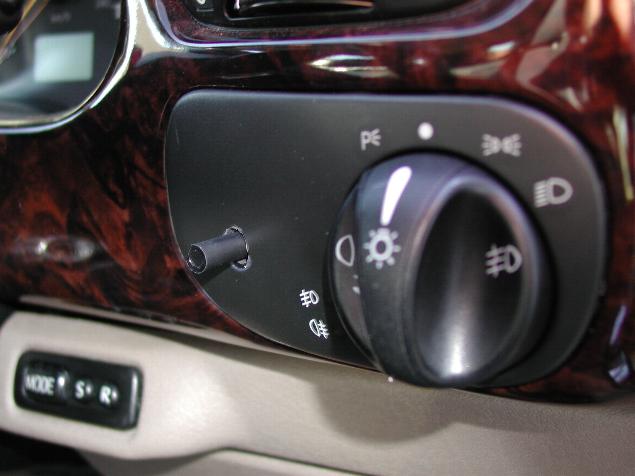
Finished A/C installation with the control knob to the left of the
headlight knob.
The ability to easily and safely access the A/C mod pot and
tweak whilst driving is a real boon and the control knob is easily accessible to
the left of the headlight knob. And of course to the un-initiated the unit looks
just like a standard fixture. Far anticlockwise is system at ford spec and far
clockwise is system on maximum.
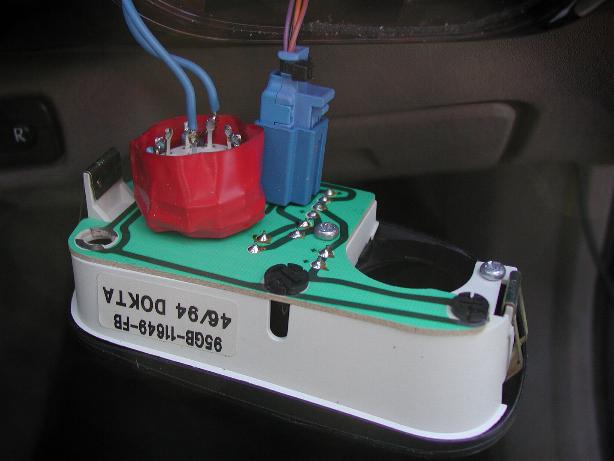
An alternative used by Dave N is
to locate the switch to the left of the headlight switch where headlight
levelling is not fitted - by drilling through and mounting the mod switch on the
back of the panel.
 Dave N
Drilling carefully allows the unit to be mounted on the rear of the panel.
 Dave
N
Dave
N
Dave N's installation. A carefully-selected
knob has since been added.
Replace all the wiper mechanism, grill etc and basically that’s it…. done.
Just a word about performance:
I have had the mod fitted since 2000 and found it to perform faultlessly.
When getting back into the parked car with an interior of say 43c I tend to
wind the A/C mod pot right around to max cooling and achieve centre vent
temps of about -4c for about 5 or 10 minutes and then back it off slightly when
the initial boost has cooled things off nicely and the auto fans have gone to
slow speed. In the height of summer I keep the mod on a lower setting as a
matter of course but I really do feel that Steve has got the range just about
right and with 10 settings to choose from as well as off defaulting to original
Ford spec I really can't fault his design.
And as far as the Controls of the Climate Control are concerned these remain
completely unaltered and should be used as normal.
This modification is simply designed to significantly boost cooling in hot
conditions and boy it works!
WARNING
As with all modifications mentioned on this site you undertake them entirely
at your own risk and neither the author or site owners bear any responsibility
to any damage caused to your car by any such modifications.
Pete C
Additional
pix and diagram by Dave N

