| 1 |
Disconnect battery |
|
| 2 |
Drain coolant. Can be drained via the lower heater hose at the pump
end to avoid removing the undertray |
|
| 3 |
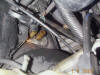
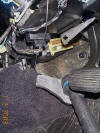
Disconnect heater hoses at the bulkhead after removing A/C drain
pipe. Access is very tight but water pump pliers on the clips worked OK.
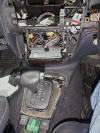
(V6 Owners may need to remove some engine inlet ducting to get better
access) |
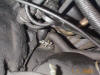
Heater hoses on bulkhead before removal
Matrix
connectors on bulkhead after hose removal
Matrix hose connector retaining plate and gasket – note
how my stubby screwdriver was too big and I needed to make up a
smaller screwdriver |
| 4 |
Remove the two heater water hose retaining plate screws. Not easy
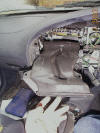
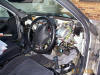
but a small stubby screwdriver will just fit. Remove plate and thick
rubber gasket. Gasket should be OK to reuse if not damaged |
|
| 5 |
Release steering wheel lever and pull steering wheel out and down to
maximise clearances |
|
| 6 |
Remove the radio, pull off heater control knobs |
|
| 7 |
Lever out the trip computer switch with a small screwdriver and
disconnect at the multiplug. Remove the lower fascia (five screws) as
described under “Instrument Bulbs” on the Website. Disconnect the bonnet
release cable from the lever, (pull in the slack and it can be released
just like a bicycle brake lever). Disconnect the OBD2 plug from the
panel |
|
| 8 |
Remove instrument fascia as described under “Instrument Bulbs” on
the Website (six screws and pull fascia gently). Ease forward and
disconnect multiplugs for lights, clock, heated windows and heater
switch (if fitted). If necessary remove the drivers side face level air
vent connection from the fascia (three screws) and remove fascia from
the car.
Note Take care when removing multiplugs. Many of these cannot just be
squeezed to remove, they have a small locking lever which needs pressing
with a screwdriver. Easy when you can see what you are doing - not so
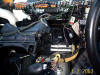
easy when doing by feel alone |

With the fascia removed - no chance of getting at it
yet |
| 9 |
Open cassette storage box and remove the handbrake switch panel (two
screws) and slide over the handbrake. Remove multiplugs |
|
| 10 |
Manual - Unscrew the gear knob. Prise up the gear lever trim panel
and slide the gaiter over the gear lever. Auto - remove trim panels but
leave selector and switch panel in place. |
|
| 11 |
Remove the remaining centre console screws (two at the front and
three at the bottom of the cassette box) and lift off, removing
multiplugs for cigarette lighter, etc |
With centre console removed – still to remove brackets. |
| 12 |
Remove main instruments (four screws), ease forward and remove three
multiplugs. Remove instruments following the instructions to keep it
vertical |
|
| 13 |
Gently lever up the crash pad upper bezel (next to the windscreen).
It clips in place |
|
| 14 |
Removing the ash tray (four screws) should let a bit more light in
but annoyingly there is no obvious way of disconnecting it electrically |
|
| 15 |
Remove heater control panel base (four screws) and push back into
dashboard. (This allows the fascia crash pad to be pulled back without
being held back by the heater control cables. Alternatively the control
cables can be released at the heater but then they will have to be
readjusted for length during reassembly). For Cars with CC the HBC
module can be easily removed and there are no control cables to worry
about. |
|
| 16 |
Reach into dash and remove centre vent duct (two nuts) |
Removing Centre air vent duct |
| 17 |
Remove glove box by prising off the two spring clips and pulling the
box out |
|
| 18 |
Remove 'squarish' plate around the gear lever (four screws) and the
bracket just in front of the gear lever (two screws) which is preventing
the fascia crash panel from swinging out |
|
| 19 |
Release fascia crash pad at the top (three screws below the
windscreen) the side (one screw by the passenger door, two nuts behind
the glove box, one screw in front of the steering wheel) and the bottom
(two screws in front of the gear lever) |
|
| 20 |
Pull fascia crash pad out and up a few inches. It won’t go very far
due to the steering wheel. Keep an eye on the passenger air bag wiring.
Wedge it up near the gear lever (or engage first and rest it on the gear
lever).
If no passenger air bag, the fascia crash pad can be removed by
maneuvering around steering wheel after removing three connectors for
the ashtray near the heated window switches. |
With Fascia crash pad resting on gear selector – hardly
any space to work.
With Fascia crash pad completely removed |
| 21 |
Detach each rear footwell nozzle from the heater by pushing in the
pin in the centre of the retaining clip. Losing the pin down the air
duct is almost certain. Prise the two heater ducts apart and wedge them
with something suitable to allow the heater to be moved out into the
passenger compartment |
|
| 22 |
Remove the two nuts securing the heater box to the bulkhead. Note
that the bulkhead here is horizontal, (below the air conditioning
cooler) |
|
| 23 |
Release the four heater ducts from the heater box. [Removing the
vent trunking from the passenger side vent (one screw at the fascia end)
and the demister vent (one screw and one nut) may help]. Some cabling
nylon ties and bits of sponge may have to be released to access demister
vent screws. Removing the equivalent bits from the drivers side is near
impossible as it snakes over the steering column, so try do it without |
After removal of heater bolts and moving it a couple of
cms- may be enough clearance on LHD to change matrix at this point |
| 24 |
Pull heater box into the passenger compartment. Unlike the rest of
the fascia the heater box is made of a very brittle plastic which breaks
easily, grab the whole box and pull gently. It will probably catch on
the bulkhead insulation which is heavy rubber backed and doesn’t bend
easily. Consider cutting it if necessary (and gluing it back afterwards) |
|
| 25 |
When the heater box has moved a few inches, remove the two screws
holding the heater matrix to the heater box. Rotate the heater box and
ease into the passenger compartment until the heater matrix can be
removed past the steering column and pedals |
Heater pulled about 30cm into car, matrix almost fully
out.
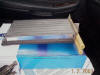
New Matrix ready to go in. |
Replacement procedure
Reverse of the removal procedure
Reconnecting the heater ducts on the drivers side is very difficult,
particularly the face level vent connection as it fits at an angle.
Consider cheating and cutting 3-4 axial slots for the last two inches to
make it easier to stretch over the heater. Then secure with a cable tie.
Replace the hose plate and gasket in the engine bay before putting the
dash back in case you need to lever the heater box to get the screw holes
to align.
Leave all cut cable ties in place as a reminder to replace when putting
back together.
When refitting the heater water hose retaining plate it will probably
be difficult to locate the two screws in the bulkhead. Try slightly longer
screws (but check the screws you use are not so long they risk penetrating
the heater matrix) and temporarily securing them with 'Blue Tac' to hold
them in place while you get the plate into position.
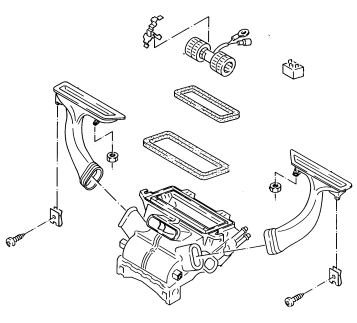
Here are some diagrams to assist you