|


|
|
|
Adding an illuminated Sunroof Switch
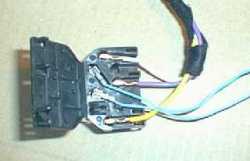
For some reason known only to themselves, Ford seem to always fit a sunroof
switch that does not illuminate. The switch is usually the same as those fitted
to the doors to control the windows, but re-tooled without the bulb or
connections. The illustration (right) shows the sunroof switch as fitted on the
left and the window switch on the right. The two missing piins on the left hand
switch are, of course, those that take power for the switch illumination. I
guess one argument could be "Why would you want to operate your sunroof when
it's dark?", but even if you don't use it on late summer evenings when it's hot,
what about in car parks etc? |
|
Getting a Switch
Fortunately, this problems is fairly easily rectified. The switch fitted in the
Scorpio is the same as that used in the Mk3 Granada, and is interchangeable with
the Mk 3 door switches for the electric windows. I managed to pick one up at my
local scrap yard for £3, though you can still get them from Ford but they're
pretty pricey. I seem to remember last time I enquired, they were about £13 and
that was a couple of years ago.
On the down side, the switch I got had a blown bulb, a perennial problem with
these switches. I used to have a Granada, and when I bought it I had to replace
six out of the seven switch lamps. Although they are not designed to be changed
(as they are soldered in to the switch) changing them is quite straight forward.
A suitable replacement is available from Maplin (part code WQ13P, 69 pence each
at the time of writing) Don't be fooled by the fact they are clear, the colour
in the switch comes from a little green rubber condom that fits over the bulb.
The pins for the light are 2 and 5. To check a switch, just stick 12v across
these two pins and make sure the switch lights up. If it doesn't, then you'll
need to replace the bulb.
Once you've got a working switch, fitting it is not too difficult. In order
to fit in with the window switches, the light should illuminate whenever the
ignition is in position II (basically when the engine running). Power for this
can be taken from the wiring already in place for the sunroof motor. Whilst the
whole operation can be carried out in the car, it is much easier to remove the
motor and do it at a work bench. (Particularly if it's chucking it down with
rain as it was when I did mine!)
Fitting the Switch
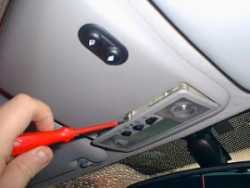 |
The screws that retain the sun roof moulding are
accessed by removing the interior light assembly. To remove this, prise it
gently out with a small screw driver from the rear center of the fitting. Once
it is free, disconnect the cables from the rear of the fitting. They only fit on
one way, so you don't need to worry about marking them for re-connection. |
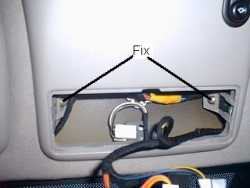
| Once the light cluster is removed, the screws are visible.
Remove the two securing screws and the pull the sun roof moulding towards the
rear of the car. It is cliped into two clips at the rear of the moulding and
they have a pretty firm grasp. I found it easier to gently rock the cover from
side to side and 'walk' it out of the clips. |
 |
|
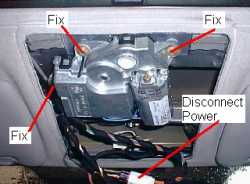
With the cover removed, the sun roof motor is
accessible. It is secured by three Torx head bolts as indicated in the photo.
There is a single multiconnector for the power which is visible at the bottom of
the photo. Disconnect the multiplug first, then undo the three securing bolts.
Make sure you support the motor whilst doing this as it falls off very easily
once the bolts are removed.
|
 |
 |
| The Sun roof motor in situ.
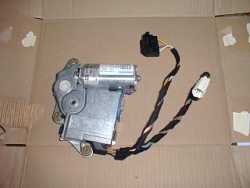
|
Removed and on the bench
ready to work on. |
|
| The connector for the switch prises
open easily to reveal the holes that accept the contact pins. The pins on the
switch are about 3mm diameter, and you need to make some form of provision to
connect to them. The best way by far would to be get the connectors from another
switch and they will just drop in. unfortunately, most scrap yards get a bit
arsey about cutting bits out of wiring looms, they'd rather sell you the whole
loom. Failing this however, there are a couple of alternatives to try. One is
to use connectors from another source. I got mine from some old junk I had
kicking around in the garage from when I used to do a lot of electronics. You
can also get bits to build your own connectors from RS
Supplies and similar places which may be suitable.
The second is to use multistrand cable and fudge it. Strip back the
insulation to about one and a half times the depth of the connector hole. Insert
the cable through the hole and spread it flatish, then fold the protruding cable
back on itself and secure is to the outside of the pin shroud with Araldirte or
similar adhesive. Check that when the switch is inserted into the plug a good
contact is made with the cable.
The light in the switch draws less that 100 mA, so you don't need heavy duty
cable. Three amp lighting flex is more than adequate for the task. |

 |
| Switch connector showing the
location for the connections |
 |
| Connectors inserted into the
correct pin holes. |
The multi plug connector to the sunroof has five cables to it. These are as
follows : NOTE: The colours are those on the car side of the connector. The
cables on the sunroof side have a different colour scheme for some reason.
| Colour |
Use |
| Black |
Ground |
| Orange |
Permanent +12v |
| Purple/Black |
Switched +12v (Live when ignition in position II) |
| Yellow/Green |
Control (Used by Global opening / closing) |
| White/green |
Control (Used by Global opening / closing) |
You need to make connections to the Black (Ground) and Purple/Black (Switched
12V) connectors. I did this by stripping back about 5mm of insulation, folding
the exposed wire back on itself and then forcing it into the back of the plug.
Once securely located, I taped the wires in place to prevent movement dislodging
them. This is not an ideal method of fixing, but given the lack of movement of
the parts, is sufficient. A better way would perhaps be either with Scotch Locks
or remove the pins from the connector and solder the illumination wire to them.
Once you have made the connection, in the good old Haynes style, refitting is
the reverse of the removal instructions. Once you have refitted and re-connected
the motor, check to make sure the sun roof still works correctly and that the
switch illuminates on when you turn on the ignition. If everything is OK, then
refit the sunroof moulding and retaining screws and refit the interior light.
|
|
