![]()
![]()
|
|
|
|
|
|
|
Last update: 10/06/2006 |
|
|
|
|
|
|
|
|
|
Details |
Recently, I bit the bullet and purchased a Satnav system - the TomTom Go 300. I had already seen the TomTom software running on a PDA and I was impressed, but I have no real use for one of those and it seemed a bit fiddly and 'techy' for me. When TomTom released the stand-alone satellite navigation Go 300, 500 and 700 I decided to get the 300.
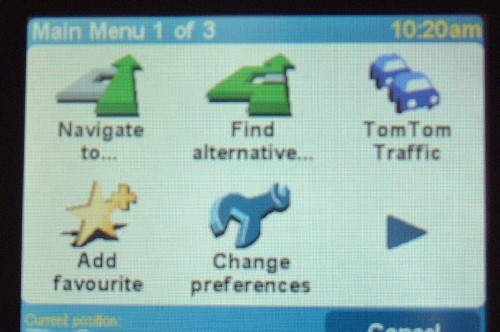
The TomTom Go 300. Slightly too large to slip into a pocket, it has its own carrying case. The size is partly because of the excellent speaker at the rear of the unit - much better sound than you get with a PDA - which can be weedy. This unit can be heard even with the radio on! The 300 is dedicated to TomToms' class-leading navigation software which is installed complete with maps on a single 128Mb memory card. Inside is a rechargeable battery good for 4 hours of continuous use, and the kit is complete with a small carrying case, PC connection lead, in-car charger and mounting arm. Immediately I found that there some issues using this unit on my Scorpio. My Ultima has a quick-clear windscreen, the element of which screens the unit from the satellite signals. The Go did not pick up a signal at all in the centre of the dashboard where I would have liked to put it. Fortunately when I checked the windscreen element it ends well short of the offside windscreen edge, and this clear space is enough to allow the satellite signals to get to the TomTom receiver. Another problem is that the clamping arm provided reduces the reception by up to 30%, so that although the unit will work perfectly while free standing on the right hand edge of the dashboard, as soon as you clamp it up on the arm it loses the signals and gets confused. This is poor, in my opinion - but it is easily remedied by buying a signal antenna - a further £40 approx, but for now I have used it in the extreme right corner of the dash. IMO an ideal location for the antenna would be next to the UV sensor on the top right of the dashboard. When you power it up, the unit shows you a brief TomTom logo and then opens to a map of its last known location while it searches for a signal. Touching the screen brings up the first of three main menus:
Here you can use the TomTom Traffic to receive congestion warnings through your Bluetooth mobile phone, change the preferences and favourites. Touching the Navigate to icon takes you to the next submenu:
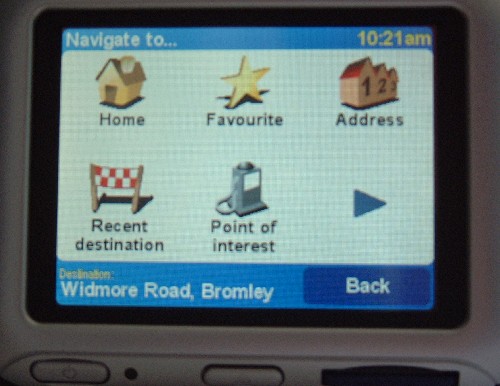
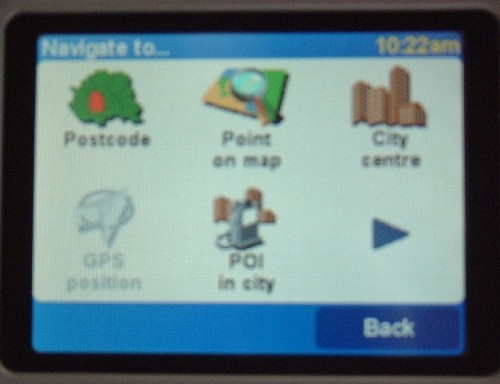
This menu gives the option of going straight Home, going to a Favourite or even a recent destination that you have used. The address option asks first for a City, then provides a drop-down list that changes as you press the letters - L O N for example takes you straight to London, and the same drop-down list occurs as you press the letters for the street name. POSTCODES My Go 300 was delivered with software Version 5.0. I immediately logged in to the TomTom site and downloaded the new version, 5.2, which gives a Post Code option for selecting an address:
Touching the Postcode icon then presents the touch screen typewriter and pressing the buttons for the letter shows the drop down menu for the postcode you are looking for -
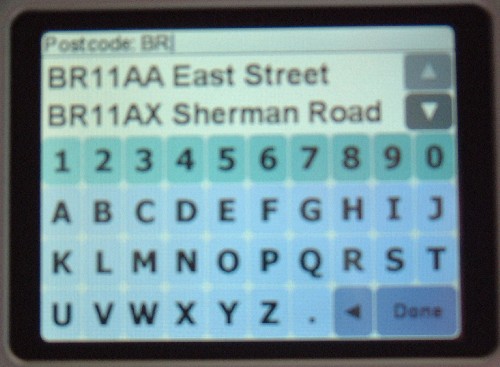
Above, I have selected the letters BR. I can scroll down the list using the arrows on the right, or I can continue to press the numbers until the postcode is recognised. Then selecting the number of the house means that the Go will take you direct to the door. The unit quickly analyses the roads needed, and if there is a Toll or Congestion charge implicated it will ask you whether you wish to avoid it. You can then look at a text list showing the route, a map of the route selected, and even a Demo mode, where the journey is played out in 3D on the screen. Here the chosen route can be verified before you start out. There is even Itinerary planning, where several locations can be programmed at once, to treat each destination as a way point, and go on to the next. It does not, however, work out the best route to visit all of these destinations - not yet, anyway. NAVIGATING The unit shows the road ahead in 3D perspective, although you can select a flat 2D image if you wish. The following are low-speed displays - at higher speeds non-essential detail is omitted to avoid distraction.
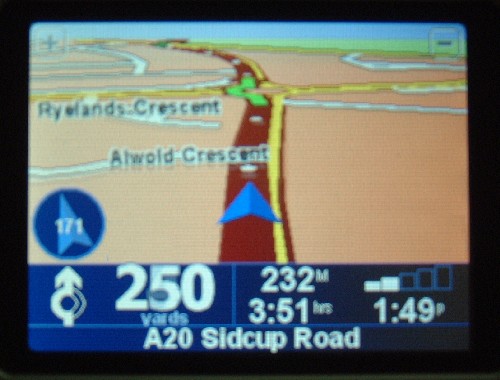
The map configures itself so that it always stretches ahead of the driver, a brilliantly simple but effective strategy. Road changes such as junctions and roundabouts are signalled by the blue box on the left below the screen. Above, this shows a roundabout, and I am to go straight ahead in 250 yards. The map also shows the route clearly as I approach, with the correct route highlighted in green. A user-selectable voice announces the action to take and the distance and this advice is repeated as the car reaches the junction.
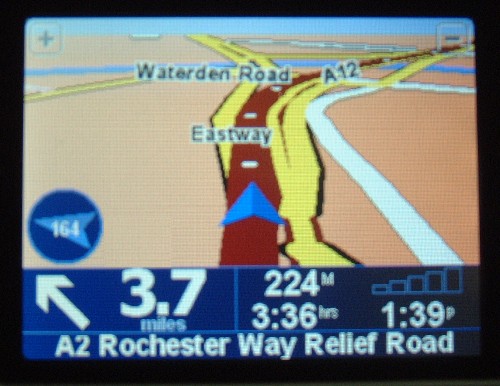
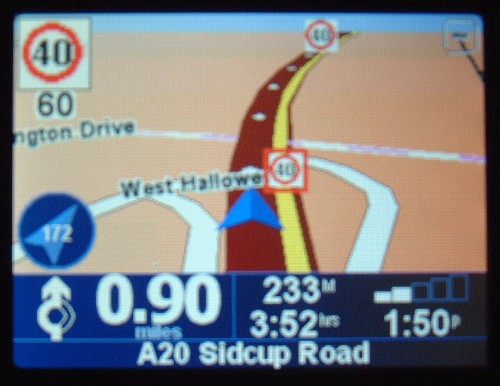
Here, the road selected clearly demonstrates the junction detail around me. The blue box is showing that the next junction to take is a left turn, in 3.7 miles. The faded + and - buttons on the top corners of the screen are to change the perspective of the view - I like to see a bit of horizon so the selected perspective is quite high. The blue arrow in the circle represents North, with the degrees of the current heading shown inside. This is also a new feature of Version 5.2. So far, so excellent. The screen can be dimmed to Night time colours to reduce the glare and, because the roads are shown in perspective, bends ahead at night can be checked with a glance at the screen and assessed for safety, concealed junctions etc. But there's more... POI Points of Interest have been collected by satnav users for some years. They consist of a text list of the latitude and longtitude of given points together with a brief text note, stored by users when they pass a particular location. Many lists have been prepared and can be downloaded freely from the Net. You might be interested in Battlefields, Little Chef restaurants, castles, Iron Age sites and many others. Of course, people were very quick to record Gatso Cameras locations. For several years drivers have been storing the locations of both static and mobile speed cameras when they see them and sending them to the website where they have been collated. Now everyone can download the Speed Camera POIs from PocketGPSWorld. (Although this used to be free, a subscription to the site is needed now via PayPal, £2 per month or £19 per year.) Once you install the POI file and switch them on in the Configure menu to warn when nearby, any current Gatso camera will show on the screen as you approach it. The POI file is updated about every two weeks so few new cameras are missed. The Go unit has built-in sound effects that can be attached to POIs so that they sound when the POI is reached. This attracts the view of the driver. However, these noises are chimes, bells, whistles, and even the moo of a cow, and these are perhaps not the most useful noises to have. Those clever chaps at PocketGPSWorld have created voice files that replace the internal sound effects. This is done simply by replacing the data.chk file on the Go memory card with the downloaded file - now you get a verbal warning as you approach a Gatso camera or a site where mobile cameras have been used. The result of the POI download is plain on the map display:
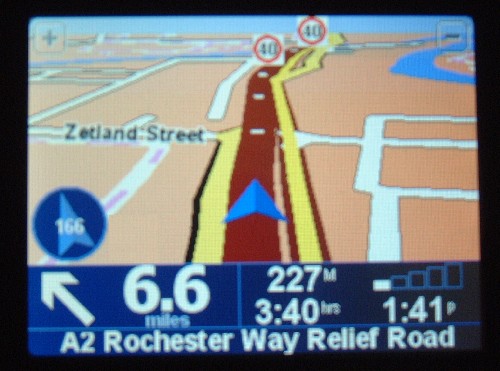
Above, the A2 Rochester Way. Two Gatso cameras are on my route. As I approach them, the new sound effect gives a loud Bong! and the verbal warning "Gatso, 40" The camera icon on the map, flashes, and on the top left corner the same icon is repeated, flashing as it counts down the yards to the camera:
Above, the warning as I approach a speed camera. The verbal announcement has already been made, and the icon on the top left of the screen flashes as the yards-to-point decrease. The accuracy of these positions is spot-on; the camera slides past your nearside window as the graphic disappears off the screen. I don't use this facility in order to break the law - but as a useful reminder to check my speed as I pass through. And since we know that the cameras are not for revenue collection, but are only placed in areas where there are many accidents, it warns me that I'm in an accident black spot, doesn't it? Yeah, right. By the way, camera detectors that listen on radar frequencies used by speed cameras may soon be illegal again - they were until recently when a Judge ruled that they were not - so the Government is looking at introducing a legal bar to their use. POI do not detect any radio frequency but use locations already in the public domain, so they are completely lawful, and will remain so. Conclusion Apart from my disappointment with the mount noted above, I am very pleased with the performance of this little unit. The screen is clear and bright in daylight, subdued but clear in darkness. The touch-screen menus are intuitive and easy to use and the navigation works really well. If you try to fool it by deliberately taking a wrong turn it advises a U turn to get back on track; the software then recalculates the route and issues new instructions automatically in just a few seconds. Another useful feature is a roadblock facility - if one hears on the radio or sees an accident ahead, the software can calculate a new route around it. Being reminded about the presence of speed cameras is excellent - the POI use a lot of local knowledge, so the areas frequented by mobile detectors are also shown; unless you are local to an area you would not know where these favoured places are. Being able to concentrate on road hazards instead of the hedgerows makes a journey much less tiring - and safer too, IMO. DO NOT leave the unit unattended in the car - even for one minute. They are sought-after by the criminal fraternity because of their relatively high value and ease of theft. I do not even leave the empty mount on display - thieves may assume that the unit is simply tucked away in the glovebox and break in to find it; an expensive repair. Note: since this was written v6 of the software has even more features. Pros & Cons Pros: A dedicated unit - no software glitches, just switch on and Go Class-leading software, with user-friendly menus Frequent software updates on the TomTom site Touch screen operation Accurate positioning No expensive installation required Many useful POI files available on the WWW
Cons: Expensive purchase - around £300 The mount supplied reduces signal strength May require additional antenna for optimum performance - a further £40 approx Uses cigar lighter socket - although a secondary socket can be wired for it and a full kit can fully integrate the unit into the cars electrics - cost about £65. Updates to the maps cost £60.
Apologies for the quality of the pix - photographing the screen is a bit tricky. EricR |
||
|
|
|
Copyright © 2005/6 www.fordscorpio.co.uk |
|